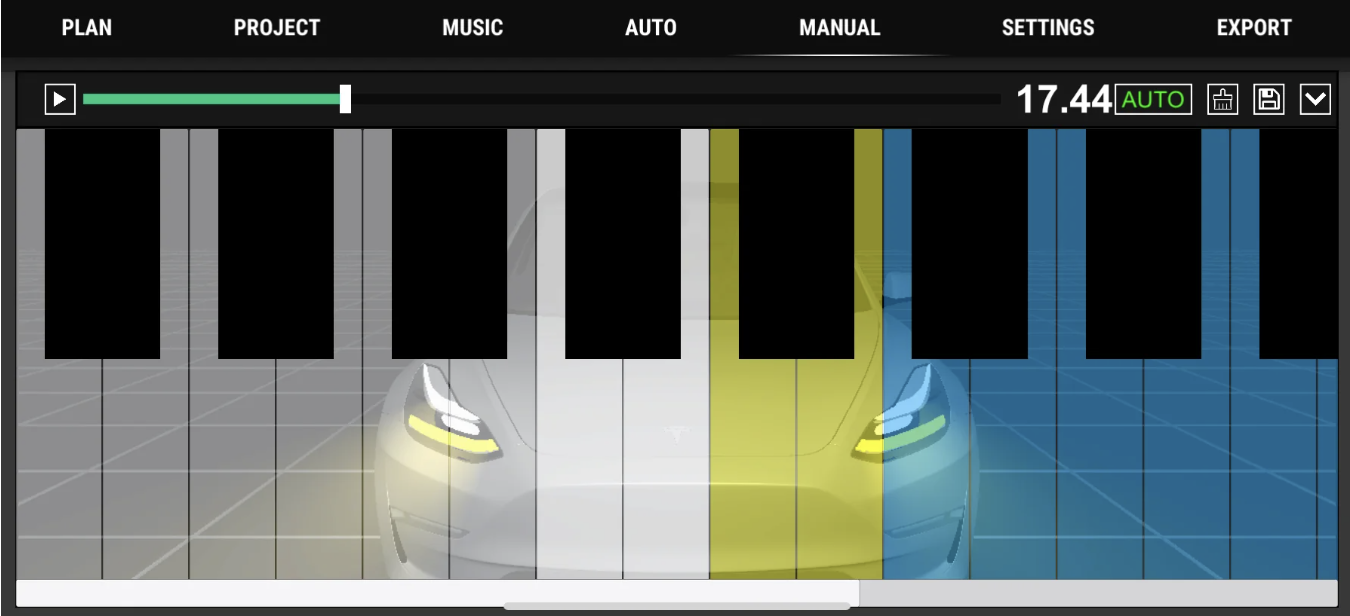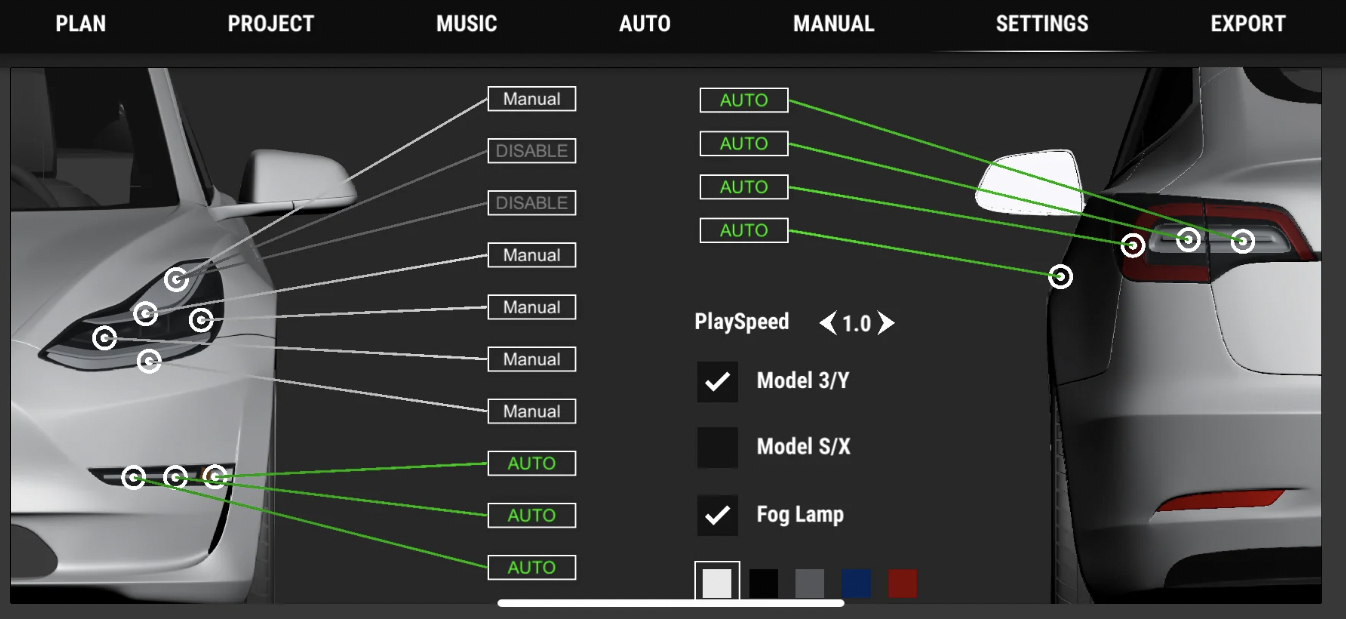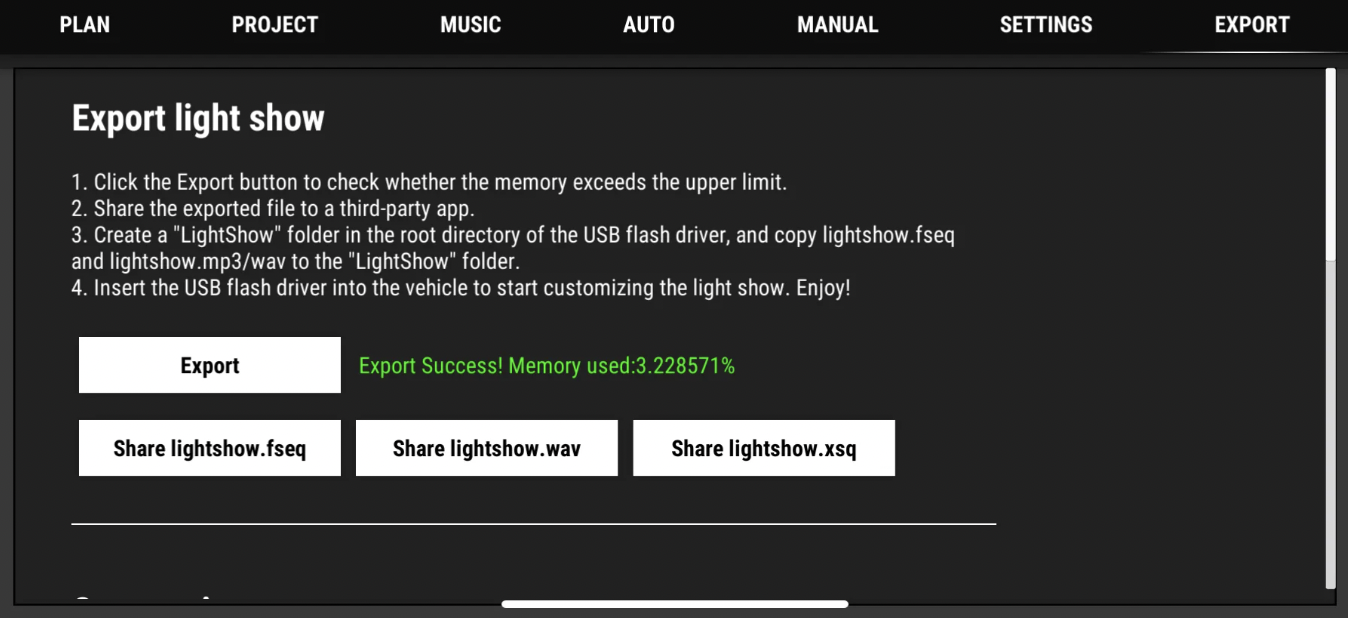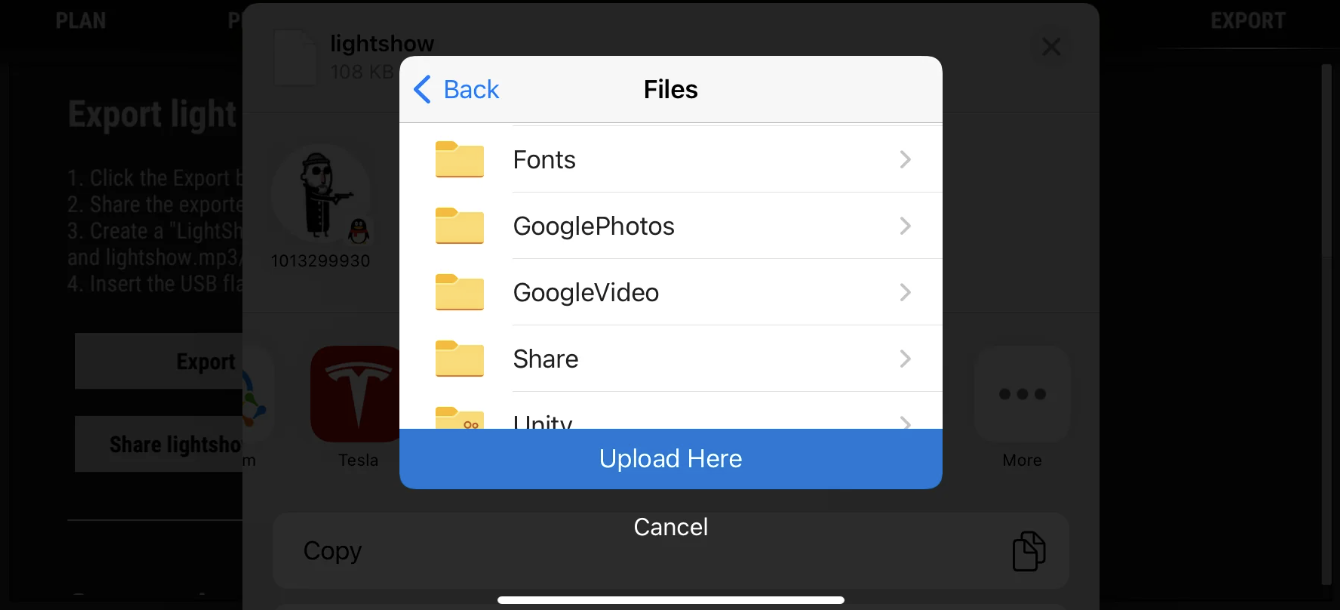
<?xml version="1.0" encoding="utf-8"?>
<feed xmlns="http://www.w3.org/2005/Atom">
  <title>独狼开发日志</title>
  
  <subtitle>Less is more</subtitle>
  <link href="http://blog.coding1024.com/atom.xml" rel="self"/>
  
  <link href="http://blog.coding1024.com/"/>
  <updated>2026-05-30T02:44:51.465Z</updated>
  <id>http://blog.coding1024.com/</id>
  
  <author>
    <name>huangjx</name>
    
  </author>
  
  <generator uri="https://hexo.io/">Hexo</generator>
  
  <entry>
    <title>浅谈务实的游戏程序员该如何做优化</title>
    <link href="http://blog.coding1024.com/posts/9dfa69e1/"/>
    <id>http://blog.coding1024.com/posts/9dfa69e1/</id>
    <published>2025-10-16T09:24:42.000Z</published>
    <updated>2026-05-30T02:44:51.465Z</updated>
    
    <content type="html"><![CDATA[<blockquote><p>近期面试了一些后端程序，问了些优化方面的问题，我发现很多人都答不好这个问题。</p></blockquote><p>先来定义一下，什么样的程序员能称之为务实。对于游戏项目来说，进度是至关重要的一个因素，所以一个务实的程序员，应当能快速解决遇到的问题，快速交付稳定的代码，而可具备一定可以维护性，以应对策划多变的需求。</p><p>举个例子，在面试中有个候选人跟我说，他做过一个背包的优化，就是原本是的结构是字典的形式，如{name:”道具1”, lv:1, num:99}，为了节省空间，他把这个结构改成数组的形式：[“道具1”, 1, 99]，以此减少了冗余的key。然后在外面再封装了api去访问字典的字段。</p><p>问题来了，这样的优化真的有必要吗。可能这个优化，对于背包这个系统确实减少了一半的内存。但是，我们需要考虑一个问题是，这个背包系统，在整个玩家数据里，真能占那么大比例吗。假如，背包的数据只占到总内存的2%，那这个优化做完了之后，变成1%，从整体来看，只让内存占用下降了1%，却带来了代码维护上的困难，以及拖慢的项目的进度，这是得不偿失的一件事。</p><p>以下是我关于优化的一些观点：</p><p>1.在游戏的研发阶段，优化是优先级最低的，我们不应该主动去做优化，开发效率和可维护性是高于优化的，除非某一个功能遇到了瓶颈。</p><p>2.我们需要了解客户端和服务器的瓶颈分别是什么：</p><p>客户端的瓶颈通常是在内存，不仅缓存了逻辑数据，还有图片，模型，字体这些资源，在客户端的进程通常只能分配非常有限的内存，所以客户端的优化通常是用时间换取空间。需要用到数据或者资源，才动态加载。</p><p>而服务端的瓶颈通常是CPU，服务器需同时面对成千上万的客户端，对于某些特定的框架(如skynet)，如果CPU有一个核跑满100%，就会导致部分功能出现明显卡顿。所以优化的方式倾向于空间换时间，在服务器启动的时候，把数据都准备好缓存起来，这样不仅逻辑更简单，更能节省运行时的CPU运算。</p><p>3.优化是无尽头的，我们在做优化之前，应该先明确所有前置条件，如数据的规模量，调用的频率。举例：服务器承载的玩家数量上限是多少，场景有多大，最多需要容纳多少个对象，玩家操作的频率。所有的优化应该紧紧围绕这些前置条件来进行，不要做吃力不讨好的优化。比如，1个服就容纳1000个玩家，排行榜就只取top100，这玩意你说要用到红黑树去排序，不纯扯(我就干过这种蠢事，还傻傻的改造了红黑树的算法去实现排名)</p><p>4.除了性能的优化，还有代码结构的优化，或者叫重构代码。重构我认为应该尽早进行，让接口变得清晰，好用，可以延迟屎山的到来(虽然我依旧认为不可避免的所有的项目都会变成屎山)。</p><p>总结：优化这个东西，适可而止，能不做就不做。这个世界就是一个草台班子，老板不会因为你提高了1%的性能给你加鸡腿。</p>]]></content>
    
    
    <summary type="html">&lt;blockquote&gt;
&lt;p&gt;近期面试了一些后端程序，问了些优化方面的问题，我发现很多人都答不好这个问题。&lt;/p&gt;
&lt;/blockquote&gt;
&lt;p&gt;先来定义一下，什么样的程序员能称之为务实。对于游戏项目来说，进度是至关重要的一个因素，所以一个务实的程序员，应当能快速解决遇到的问题，快速交付稳定的代码，而可具备一定可以维护性，以应对策划多变的需求。&lt;/p&gt;
&lt;p&gt;举个例子，在面试中有个候选人跟我说，他做过一个背包的优化，就是原本是的结构是字典的形式，如{name:”道具1”, lv:1, num:99}，为了节省空间，他把这个结构改成数组的形式：[“道具1”, 1, 99]，以此减少了冗余的key。然后在外面再封装了api去访问字典的字段。&lt;/p&gt;
&lt;p&gt;问题来了，这样的优化真的有必要吗。可能这个优化，对于背包这个系统确实减少了一半的内存。但是，我们需要考虑一个问题是，这个背包系统，在整个玩家数据里，真能占那么大比例吗。假如，背包的数据只占到总内存的2%，那这个优化做完了之后，变成1%，从整体来看，只让内存占用下降了1%，却带来了代码维护上的困难，以及拖慢的项目的进度，这是得不偿失的一件事。&lt;/p&gt;
&lt;p&gt;以下是我关于优化的一些观点：&lt;/p&gt;
&lt;p&gt;1.在游戏的研发阶段，优化是优先级最低的，我们不应该主动去做优化，开发效率和可维护性是高于优化的，除非某一个功能遇到了瓶颈。&lt;/p&gt;
&lt;p&gt;2.我们需要了解客户端和服务器的瓶颈分别是什么：&lt;/p&gt;</summary>


  </entry>
  
  <entry>
    <title>在Ubuntu上关闭透明大页（转)</title>
    <link href="http://blog.coding1024.com/posts/4827ed55/"/>
    <id>http://blog.coding1024.com/posts/4827ed55/</id>
    <published>2025-09-23T08:22:28.000Z</published>
    <updated>2026-05-30T02:35:53.547Z</updated>
    
    <content type="html"><![CDATA[<p>在 Ubuntu 上关闭透明大页（Transparent HugePages, THP）主要有两种方法：临时关闭（重启后失效）和永久关闭。下面我为你详细说明操作步骤，并补充一些注意事项。</p><p>透明大页（THP）管理指南</p><p>🔧 1. 检查当前 THP 状态</p><p>在开始操作前，建议先检查一下当前系统的 THP 状态。打开终端，输入以下命令：</p><figure class="highlight bash"><table><tr><td class="code"><pre><span class="line"><span class="built_in">cat</span> /sys/kernel/mm/transparent_hugepage/enabled</span><br></pre></td></tr></table></figure><p>如果输出中包含 [always] 或 [madvise]，表示 THP 处于启用状态；如果显示 always madvise [never]，则表示 THP 已被禁用。</p><p>⚡ 2. 临时关闭 THP（重启后失效）</p><p>如果只是想立即关闭 THP 进行测试，可以使用以下命令：</p><figure class="highlight bash"><table><tr><td class="code"><pre><span class="line"><span class="built_in">echo</span> never | <span class="built_in">sudo</span> <span class="built_in">tee</span> /sys/kernel/mm/transparent_hugepage/enabled</span><br><span class="line"><span class="built_in">echo</span> never | <span class="built_in">sudo</span> <span class="built_in">tee</span> /sys/kernel/mm/transparent_hugepage/defrag  <span class="comment"># 建议同时也关闭碎片整理</span></span><br></pre></td></tr></table></figure><p>注意：这种方法只在当前运行 session 中有效，服务器或电脑重启后 THP 又会重新启用。</p><p>🔒 3. 永久关闭 THP</p><p>以下两种方法可以实现永久关闭，推荐使用第一种（修改 GRUB），因为它更通用和标准。</p><p>方法一：通过修改 GRUB 配置（推荐）</p><ol><li>编辑 GRUB 配置文件：<figure class="highlight bash"><table><tr><td class="code"><pre><span class="line"><span class="built_in">sudo</span> nano /etc/default/grub</span><br></pre></td></tr></table></figure></li><li>找到 GRUB_CMDLINE_LINUX_DEFAULT 或 GRUB_CMDLINE_LINUX 行，在其引号内的参数中添加 transparent_hugepage=never。例如：<figure class="highlight bash"><table><tr><td class="code"><pre><span class="line">GRUB_CMDLINE_LINUX_DEFAULT=<span class="string">&quot;quiet splash transparent_hugepage=never&quot;</span></span><br><span class="line"><span class="comment"># 或者</span></span><br><span class="line">GRUB_CMDLINE_LINUX=<span class="string">&quot;transparent_hugepage=never&quot;</span></span><br></pre></td></tr></table></figure>如果还需要关闭 NUMA（在某些数据库场景下建议），可以一并添加 numa=off。</li><li>保存文件后，更新 GRUB：<figure class="highlight bash"><table><tr><td class="code"><pre><span class="line"><span class="built_in">sudo</span> update-grub</span><br></pre></td></tr></table></figure></li><li>重启系统：<figure class="highlight bash"><table><tr><td class="code"><pre><span class="line"><span class="built_in">sudo</span> reboot</span><br></pre></td></tr></table></figure></li></ol><p>方法二：通过 systemd 服务或 rc.local（备用方案）</p><p>某些特定应用（如 MongoDB）会推荐使用此方法。</p><ol><li>创建一个 systemd 服务文件（例如 /etc/systemd/system/disable-thp.service）：<figure class="highlight ini"><table><tr><td class="code"><pre><span class="line"><span class="section">[Unit]</span></span><br><span class="line"><span class="attr">Description</span>=Disable Transparent Huge Pages (THP)</span><br><span class="line"><span class="attr">After</span>=sysinit.target</span><br><span class="line"></span><br><span class="line"><span class="section">[Service]</span></span><br><span class="line"><span class="attr">Type</span>=<span class="literal">on</span>eshot</span><br><span class="line"><span class="attr">ExecStart</span>=/bin/sh -c <span class="string">&#x27;echo never &gt; /sys/kernel/mm/transparent_hugepage/enabled &amp;&amp; echo never &gt; /sys/kernel/mm/transparent_hugepage/defrag&#x27;</span></span><br><span class="line"></span><br><span class="line"><span class="section">[Install]</span></span><br><span class="line"><span class="attr">WantedBy</span>=basic.target</span><br></pre></td></tr></table></figure>你也可以选择使用 rc.local（如果系统支持）：<br>编辑 /etc/rc.local 文件（如果没有则创建），在 exit 0 这一行之前添加：<figure class="highlight bash"><table><tr><td class="code"><pre><span class="line">   <span class="keyword">if</span> <span class="built_in">test</span> -f /sys/kernel/mm/transparent_hugepage/enabled; <span class="keyword">then</span></span><br><span class="line">       <span class="built_in">echo</span> never &gt; /sys/kernel/mm/transparent_hugepage/enabled</span><br><span class="line">   <span class="keyword">fi</span></span><br><span class="line">   <span class="keyword">if</span> <span class="built_in">test</span> -f /sys/kernel/mm/transparent_hugepage/defrag; <span class="keyword">then</span></span><br><span class="line">       <span class="built_in">echo</span> never &gt; /sys/kernel/mm/transparent_hugepage/defrag</span><br><span class="line">   <span class="keyword">fi</span></span><br><span class="line">   ```[citation:5]</span><br><span class="line">   并确保 `rc.local` 文件有可执行权限。</span><br><span class="line">   </span><br><span class="line">2. 启用并启动服务（如果使用 systemd 方式）：</span><br><span class="line">   ```bash</span><br><span class="line">   <span class="built_in">sudo</span> systemctl daemon-reload</span><br><span class="line">   <span class="built_in">sudo</span> systemctl <span class="built_in">enable</span> disable-thp.service</span><br><span class="line">   <span class="built_in">sudo</span> systemctl start disable-thp.service</span><br></pre></td></tr></table></figure></li><li>重启系统以确保更改生效。</li></ol><p>✅ 4. 验证关闭状态</p><p>重启后，再次运行检查命令：</p><figure class="highlight bash"><table><tr><td class="code"><pre><span class="line"><span class="built_in">cat</span> /sys/kernel/mm/transparent_hugepage/enabled</span><br></pre></td></tr></table></figure><p>如果成功，输出应显示为 always madvise [never]，表明 THP 已被禁用。</p><p>⚠️ 4. 注意事项</p><p>· 为什么关闭 THP：THP 旨在自动管理大内存页，但某些应用（如 Oracle数据库、MongoDB、Redis、Hadoop 等）已知与其存在兼容性问题，可能导致性能下降、内存延迟或异常开销。关闭 THP 可以避免这些潜在问题。<br>· 性能权衡：对于某些其他工作负载，THP 可能有益。除非你遇到特定问题或有应用明确要求，否则无需禁用。通常只有在运行上述特定企业级软件时才建议关闭。<br>· 关闭 Defrag：建议同时将 enabled 和 defrag 都设置为 never。<br>· NUMA：在某些数据库应用场景中，有时会建议同时关闭 NUMA（numa=off），但这与 THP 是独立的配置，请根据你的具体软件建议决定。</p><p>💎 总结</p><p>关闭 Ubuntu 的透明大页并不复杂。通常而言，修改 GRUB 配置是最常用且一劳永逸的方法。完成操作后，务必重启系统并验证状态。</p><p>如果你在操作过程中遇到任何问题，或者想知道更多关于你的特定应用为何需要关闭 THP 的细节，我很乐意提供进一步帮助。</p>]]></content>
    
    
    <summary type="html">&lt;p&gt;在 Ubuntu 上关闭透明大页（Transparent HugePages, THP）主要有两种方法：临时关闭（重启后失效）和永久关闭。下面我为你详细说明操作步骤，并补充一些注意事项。&lt;/p&gt;
&lt;p&gt;透明大页（THP）管理指南&lt;/p&gt;
&lt;p&gt;🔧 1. 检查当前 THP 状态&lt;/p&gt;
&lt;p&gt;在开始操作前，建议先检查一下当前系统的 THP 状态。打开终端，输入以下命令：&lt;/p&gt;
&lt;figure class=&quot;highlight bash&quot;&gt;&lt;table&gt;&lt;tr&gt;&lt;td class=&quot;code&quot;&gt;&lt;pre&gt;&lt;span class=&quot;line&quot;&gt;&lt;span class=&quot;built_in&quot;&gt;cat&lt;/span&gt; /sys/kernel/mm/transparent_hugepage/enabled&lt;/span&gt;&lt;br&gt;&lt;/pre&gt;&lt;/td&gt;&lt;/tr&gt;&lt;/table&gt;&lt;/figure&gt;

&lt;p&gt;如果输出中包含 [always] 或 [madvise]，表示 THP 处于启用状态；如果显示 always madvise [never]，则表示 THP 已被禁用。&lt;/p&gt;
&lt;p&gt;⚡ 2. 临时关闭 THP（重启后失效）&lt;/p&gt;</summary>


    <category term="linux" scheme="http://blog.coding1024.com/categories/linux/"/>
    
    
    <category term="linux" scheme="http://blog.coding1024.com/tags/linux/"/>
    
  </entry>
  
  <entry>
    <title>Nginx端口转发的坑</title>
    <link href="http://blog.coding1024.com/posts/ef62fe3f/"/>
    <id>http://blog.coding1024.com/posts/ef62fe3f/</id>
    <published>2025-04-01T08:33:20.000Z</published>
    <updated>2026-05-30T02:35:53.547Z</updated>
    
    <content type="html"><![CDATA[<blockquote><p>最近在配置Nginx转发端口的时候踩了个大坑，记录一下</p></blockquote><p>需求是这样的，我们游戏服务器使用的wss协议，需要用nginx进行大量的端口转发，如wss://xxx.com/10000 转发到 ws://xxx.com:10000，后面的端口范围是10000到11000，我不想写1000条这样的规则，于是我在网上找了这样一段代码：</p><figure class="highlight plaintext"><table><tr><td class="code"><pre><span class="line">location ~* ^/(?&lt;port&gt;\d+)$ &#123;</span><br><span class="line">    proxy_pass http://127.0.0.1:$port;</span><br><span class="line">    proxy_http_version 1.1;</span><br><span class="line">    proxy_set_header Upgrade $http_upgrade;</span><br><span class="line">    proxy_set_header Connection &quot;Upgrade&quot;;</span><br><span class="line">    proxy_set_header Host $host;</span><br><span class="line">&#125;</span><br></pre></td></tr></table></figure><p>咋一看，好像确实能用，就是把/port替换成:port。之后被同事发现了，惊呼我艹，这特么相当于在公网裸奔。服务器的安全组虽然设置了只对外开放10000到11000端口，但是这段代码，相当于在用户可以通过nginx的80或者443端口，间接访问到任意端口！当服务器的规模还小的时候，一切都正常，但是当用户量上去了，一定会被扫，一旦被扫到一些敏感端口，后果不堪设想。</p><p>如何解决这个问题，首先想到的是用if语句，但在Nginx社区中有一个说法”If Is Evil”（if是邪恶的），因为在某些复杂情况下if语句可能导致意外行为。所以我最终采取匹配数字的方式：</p><figure class="highlight plaintext"><table><tr><td class="code"><pre><span class="line">location ~* ^/(?&lt;port&gt;(20[0-9]\&#123;3\&#125;))$ &#123;</span><br><span class="line">    proxy_pass http://127.0.0.1:$port;</span><br><span class="line">    proxy_http_version 1.1;</span><br><span class="line">    proxy_set_header Upgrade $http_upgrade;</span><br><span class="line">    proxy_set_header Connection &quot;Upgrade&quot;;</span><br><span class="line">    proxy_set_header Host $host;</span><br><span class="line">&#125;</span><br></pre></td></tr></table></figure><p>意思是0到9这一区段数值重复3个，也就是10000-10999的端口能匹配上，这样子其它端口就匹配不上，或者：</p><figure class="highlight plaintext"><table><tr><td class="code"><pre><span class="line">location ~* ^/(?&lt;port&gt;2[0-1]\d\d\d)$ &#123;</span><br><span class="line">    proxy_pass http://127.0.0.1:$port;</span><br><span class="line">    proxy_http_version 1.1;</span><br><span class="line">    proxy_set_header Upgrade $http_upgrade;</span><br><span class="line">    proxy_set_header Connection &quot;Upgrade&quot;;</span><br><span class="line">    proxy_set_header Host $host;</span><br><span class="line">&#125;</span><br></pre></td></tr></table></figure>]]></content>
    
    
    <summary type="html">&lt;blockquote&gt;
&lt;p&gt;最近在配置Nginx转发端口的时候踩了个大坑，记录一下&lt;/p&gt;
&lt;/blockquote&gt;
&lt;p&gt;需求是这样的，我们游戏服务器使用的wss协议，需要用nginx进行大量的端口转发，如wss://xxx.com/10000 转发到 ws://xxx.com:10000，后面的端口范围是10000到11000，我不想写1000条这样的规则，于是我在网上找了这样一段代码：&lt;/p&gt;
&lt;figure class=&quot;highlight plaintext&quot;&gt;&lt;table&gt;&lt;tr&gt;&lt;td class=&quot;code&quot;&gt;&lt;pre&gt;&lt;span class=&quot;line&quot;&gt;location ~* ^/(?&amp;lt;port&amp;gt;&#92;d+)$ &amp;#123;&lt;/span&gt;&lt;br&gt;&lt;span class=&quot;line&quot;&gt;    proxy_pass http://127.0.0.1:$port;&lt;/span&gt;&lt;br&gt;&lt;span class=&quot;line&quot;&gt;    proxy_http_version 1.1;&lt;/span&gt;&lt;br&gt;&lt;span class=&quot;line&quot;&gt;    proxy_set_header Upgrade $http_upgrade;&lt;/span&gt;&lt;br&gt;&lt;span class=&quot;line&quot;&gt;    proxy_set_header Connection &amp;quot;Upgrade&amp;quot;;&lt;/span&gt;&lt;br&gt;&lt;span class=&quot;line&quot;&gt;    proxy_set_header Host $host;&lt;/span&gt;&lt;br&gt;&lt;span class=&quot;line&quot;&gt;&amp;#125;&lt;/span&gt;&lt;br&gt;&lt;/pre&gt;&lt;/td&gt;&lt;/tr&gt;&lt;/table&gt;&lt;/figure&gt;
&lt;p&gt;咋一看，好像确实能用，就是把/port替换成:port。之后被同事发现了，惊呼我艹，这特么相当于在公网裸奔。服务器的安全组虽然设置了只对外开放10000到11000端口，但是这段代码，相当于在用户可以通过nginx的80或者443端口，间接访问到任意端口！当服务器的规模还小的时候，一切都正常，但是当用户量上去了，一定会被扫，一旦被扫到一些敏感端口，后果不堪设想。&lt;/p&gt;
&lt;p&gt;如何解决这个问题，首先想到的是用if语句，但在Nginx社区中有一个说法”If Is Evil”（if是邪恶的），因为在某些复杂情况下if语句可能导致意外行为。所以我最终采取匹配数字的方式：&lt;/p&gt;
&lt;figure class=&quot;highlight plaintext&quot;&gt;&lt;table&gt;&lt;tr&gt;&lt;td class=&quot;code&quot;&gt;&lt;pre&gt;&lt;span class=&quot;line&quot;&gt;location ~* ^/(?&amp;lt;port&amp;gt;(20[0-9]&#92;&amp;#123;3&#92;&amp;#125;))$ &amp;#123;&lt;/span&gt;&lt;br&gt;&lt;span class=&quot;line&quot;&gt;    proxy_pass http://127.0.0.1:$port;&lt;/span&gt;&lt;br&gt;&lt;span class=&quot;line&quot;&gt;    proxy_http_version 1.1;&lt;/span&gt;&lt;br&gt;&lt;span class=&quot;line&quot;&gt;    proxy_set_header Upgrade $http_upgrade;&lt;/span&gt;&lt;br&gt;&lt;span class=&quot;line&quot;&gt;    proxy_set_header Connection &amp;quot;Upgrade&amp;quot;;&lt;/span&gt;&lt;br&gt;&lt;span class=&quot;line&quot;&gt;    proxy_set_header Host $host;&lt;/span&gt;&lt;br&gt;&lt;span class=&quot;line&quot;&gt;&amp;#125;&lt;/span&gt;&lt;br&gt;&lt;/pre&gt;&lt;/td&gt;&lt;/tr&gt;&lt;/table&gt;&lt;/figure&gt;
&lt;p&gt;意思是0到9这一区段数值重复3个，也就是10000-10999的端口能匹配上，这样子其它端口就匹配不上，或者：&lt;/p&gt;</summary>


    <category term="linux" scheme="http://blog.coding1024.com/tags/linux/"/>
    
  </entry>
  
  <entry>
    <title>Unity更新Google结算库6.2.1</title>
    <link href="http://blog.coding1024.com/posts/76580d95/"/>
    <id>http://blog.coding1024.com/posts/76580d95/</id>
    <published>2024-07-16T07:48:02.000Z</published>
    <updated>2026-05-30T02:35:53.612Z</updated>
    
    <content type="html"><![CDATA[<blockquote><p>最近谷歌商店强制要求所有应用在8月31日前更新结算库更新到版本6，我在Unity Package Manager更新IAP到4.12.0，发现打包安卓的时候编译失败。论坛上发现其它人也有一样的问题，Unity官方还未修复此问题，只能退回4.11.0，手动更新Google结算库了。</p></blockquote><h2 id="IAP退回4-11-0">0.1. IAP退回4.11.0</h2><p>在Package Manager中回退到4.11.0</p><h2 id="下载aar">0.2. 下载aar</h2><p>在这里下载billing的aar文件 <a href="https://maven.google.com/web/index.html?q=billing#com.android.billingclient:billing:6.2.1">https://maven.google.com/web/index.html?q=billing#com.android.billingclient:billing:6.2.1</a></p><h2 id="替换aar">0.3. 替换aar</h2><p>1.把billing:6.2.1.aar拷贝到Asset目录下，这时候会自动生成同名的meta文件<br>2.在项目文件夹中搜索billing，找到billing:5.2.1.aar的所在目录(注意，它的同级目录下还有一个同名meta文件),这把两个文件删除，并把billing:6.2.1.aar和billing:6.2.1.aar.meta文件移动到该目录</p><h2 id="更新build-gradle">0.4. 更新build.gradle</h2><p>打开build.gradle，把billing:5.2.1改成billing:6.2.1。搞定收工！</p>]]></content>
    
    
    <summary type="html">&lt;blockquote&gt;
&lt;p&gt;最近谷歌商店强制要求所有应用在8月31日前更新结算库更新到版本6，我在Unity Package Manager更新IAP到4.12.0，发现打包安卓的时候编译失败。论坛上发现其它人也有一样的问题，Unity官方还未修复此问题，只能退回4.11.0，手动更新Google结算库了。&lt;/p&gt;
&lt;/blockquote&gt;
&lt;h2 id=&quot;IAP退回4-11-0&quot;&gt;0.1. IAP退回4.11.0&lt;/h2&gt;&lt;p&gt;在Package Manager中回退到4.11.0&lt;/p&gt;
&lt;h2 id=&quot;下载aar&quot;&gt;0.2. 下载aar&lt;/h2&gt;&lt;p&gt;在这里下载billing的aar文件 &lt;a href=&quot;https://maven.google.com/web/index.html?q=billing#com.android.billingclient:billing:6.2.1&quot;&gt;https://maven.google.com/web/index.html?q=billing#com.android.billingclient:billing:6.2.1&lt;/a&gt;&lt;/p&gt;
&lt;h2 id=&quot;替换aar&quot;&gt;0.3. 替换aar&lt;/h2&gt;&lt;p&gt;1.把billing:6.2.1.aar拷贝到Asset目录下，这时候会自动生成同名的meta文件&lt;br&gt;2.在项目文件夹中搜索billing，找到billing:5.2.1.aar的所在目录(注意，它的同级目录下还有一个同名meta文件),这把两个文件删除，并把billing:6.2.1.aar和billing:6.2.1.aar.meta文件移动到该目录&lt;/p&gt;</summary>


    <category term="Unity" scheme="http://blog.coding1024.com/categories/Unity/"/>
    
    
    <category term="编译" scheme="http://blog.coding1024.com/tags/%E7%BC%96%E8%AF%91/"/>
    
  </entry>
  
  <entry>
    <title>IOS访问Document Directory(沙箱目录)</title>
    <link href="http://blog.coding1024.com/posts/bb92b2a1/"/>
    <id>http://blog.coding1024.com/posts/bb92b2a1/</id>
    <published>2024-01-29T01:50:51.000Z</published>
    <updated>2026-05-30T02:35:53.609Z</updated>
    
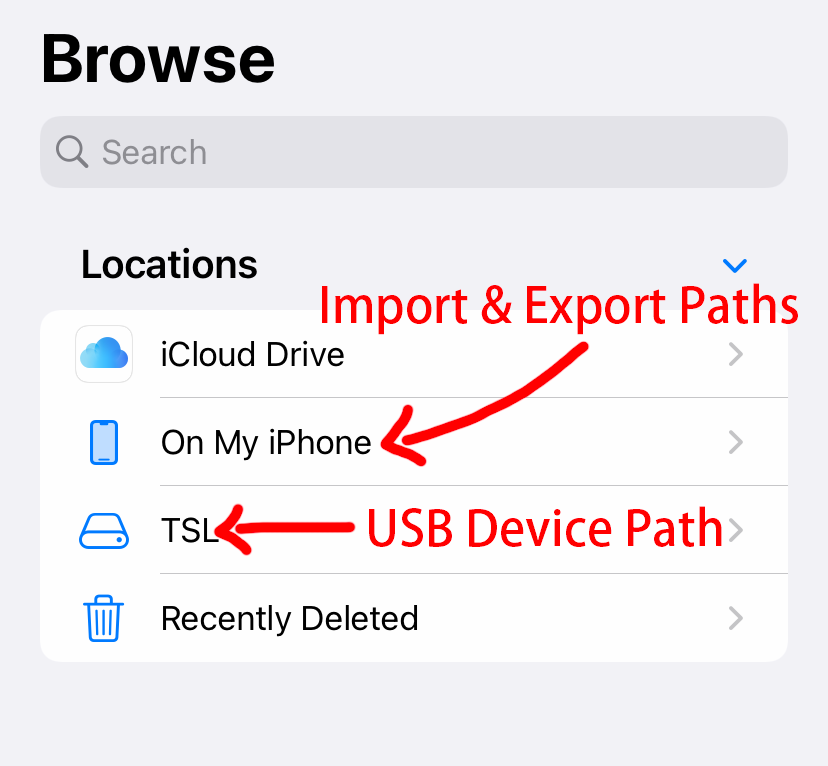
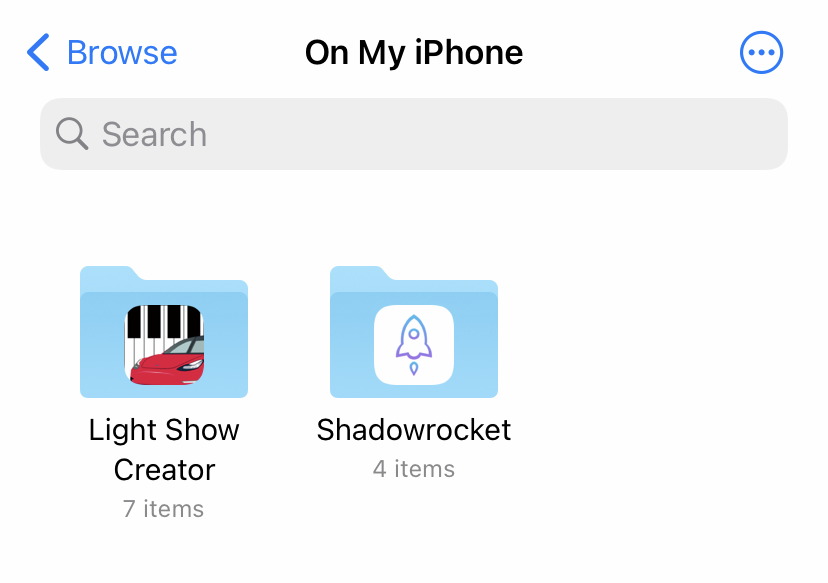
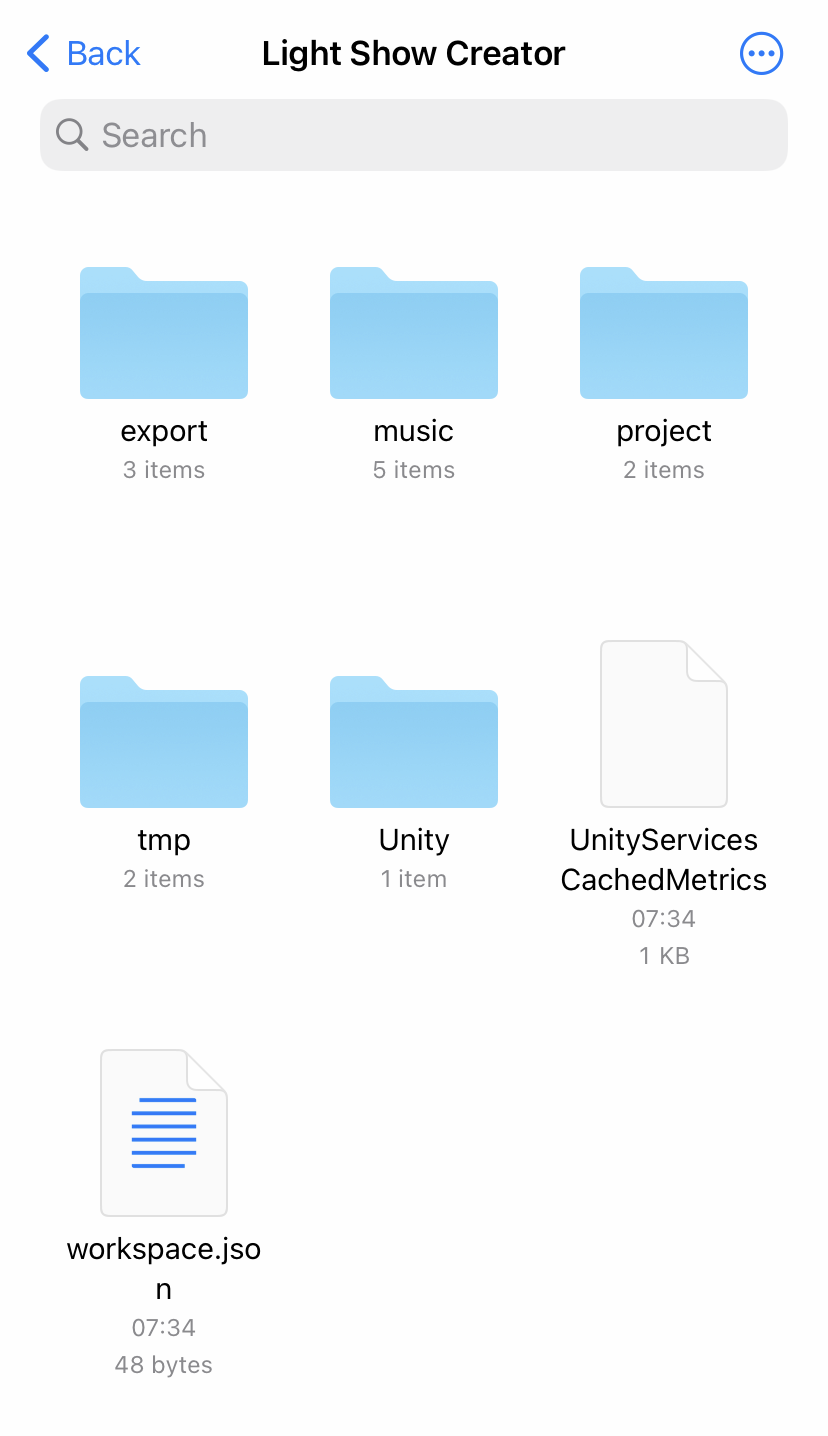
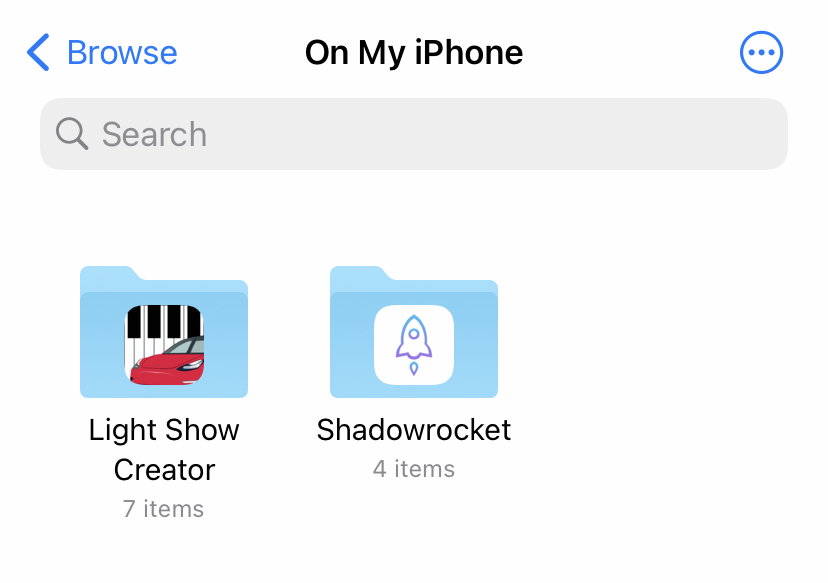
    <content type="html"><![CDATA[<p>iOS11之后，在Plist中设置LSSupportsOpeningDocumentsInPlace和UIFileSharingEnabled为YES，可以从系统的Files应用中访问应用的Documents目录。<br><img src="/posts/bb92b2a1/creator-path.png"><br>从系统的文件打开，查看我的iPhone，开启了此功能的应用可以从这里面看到这个文件夹，这个文件夹是从应用内部的沙箱目录链接过来的，应用删除后会被随之删除。</p>]]></content>


    <summary type="html">&lt;p&gt;iOS11之后，在Plist中设置LSSupportsOpeningDocumentsInPlace和UIFileSharingEnabled为YES，可以从系统的Files应用中访问应用的Documents目录。&lt;br&gt;&lt;img src=&quot;/posts/bb92b2a1/</summary>


    <category term="Unity" scheme="http://blog.coding1024.com/categories/Unity/"/>
    
    
    <category term="编译" scheme="http://blog.coding1024.com/tags/%E7%BC%96%E8%AF%91/"/>
    
  </entry>
  
  <entry>
    <title>Unity接入Admob</title>
    <link href="http://blog.coding1024.com/posts/1621995/"/>
    <id>http://blog.coding1024.com/posts/1621995/</id>
    <published>2024-01-19T17:56:48.000Z</published>
    <updated>2026-05-30T02:35:53.612Z</updated>
    
    <content type="html"><![CDATA[<h1 id="细节参考文档">1. 细节参考文档</h1><ul><li><a href="https://developers.google.com/admob/unity/quick-start?hl=zh-cn">官方文档</a></li><li><a href="https://github.com/googleads/googleads-mobile-unity">Github示例</a></li></ul><h1 id="安装依赖">2. 安装依赖</h1><ul><li>Assets -&gt; Google Mobile Ads -&gt; Android -&gt; Resolve</li><li>Assets -&gt; Google Mobile Ads -&gt; IOS -&gt; cocopads</li></ul><h1 id="报错">3. 报错</h1><figure class="highlight plaintext"><table><tr><td class="code"><pre><span class="line">AndroidJavaException: java.lang.ClassNotFoundException: com.google.android.gms.ads.initialization.OnInitializationCompleteListener</span><br></pre></td></tr></table></figure><p>Build Settings &gt; Player Setting &gt; Publishing Settings &gt; Custom Progurard File</p><p>proguard-user.txt:</p><figure class="highlight plaintext"><table><tr><td class="code"><pre><span class="line">-keep class com.google.unity.** &#123;</span><br><span class="line">   *;</span><br><span class="line">&#125;</span><br><span class="line">-keep public class com.google.android.gms.ads.**&#123;</span><br><span class="line">   public *;</span><br><span class="line">&#125;</span><br><span class="line">-keep public class com.google.ads.**&#123;</span><br><span class="line">   public *;</span><br><span class="line">&#125;</span><br><span class="line">-keepattributes *Annotation*</span><br><span class="line">-dontobfuscate</span><br></pre></td></tr></table></figure>]]></content>
    
    
    <summary type="html">&lt;h1 id=&quot;细节参考文档&quot;&gt;1. 细节参考文档&lt;/h1&gt;&lt;ul&gt;
&lt;li&gt;&lt;a href=&quot;https://developers.google.com/admob/unity/quick-start?hl=zh-cn&quot;&gt;官方文档&lt;/a&gt;&lt;/li&gt;
&lt;li&gt;&lt;a href=&quot;https://github.com/googleads/googleads-mobile-unity&quot;&gt;Github示例&lt;/a&gt;&lt;/li&gt;
&lt;/ul&gt;
&lt;h1 id=&quot;安装依赖&quot;&gt;2. 安装依赖&lt;/h1&gt;&lt;ul&gt;
&lt;li&gt;Assets -&amp;gt; Google Mobile Ads -&amp;gt; Android -&amp;gt; Resolve&lt;/li&gt;
&lt;li&gt;Assets -&amp;gt; Google Mobile Ads -&amp;gt; IOS -&amp;gt; cocopads&lt;/li&gt;
&lt;/ul&gt;
&lt;h1 id=&quot;报错&quot;&gt;3. 报错&lt;/h1&gt;&lt;figure class=&quot;highlight plaintext&quot;&gt;&lt;table&gt;&lt;tr&gt;&lt;td class=&quot;code&quot;&gt;&lt;pre&gt;&lt;span class=&quot;line&quot;&gt;AndroidJavaException: java.lang.ClassNotFoundException: com.google.android.gms.ads.initialization.OnInitializationCompleteListener&lt;/span&gt;&lt;br&gt;&lt;/pre&gt;&lt;/td&gt;&lt;/tr&gt;&lt;/table&gt;&lt;/figure&gt;
&lt;p&gt;Build Settings &amp;gt; Player Setting &amp;gt; Publishing Settings &amp;gt; Custom Progurard File&lt;/p&gt;</summary>


    <category term="Unity" scheme="http://blog.coding1024.com/tags/Unity/"/>
    
  </entry>
  
  <entry>
    <title>docker设置代理</title>
    <link href="http://blog.coding1024.com/posts/753c22c6/"/>
    <id>http://blog.coding1024.com/posts/753c22c6/</id>
    <published>2023-08-25T06:20:46.000Z</published>
    <updated>2026-05-30T02:35:53.547Z</updated>
    
    <content type="html"><![CDATA[<h1 id="在linux下部署clash">1. 在linux下部署clash</h1><p><a href="https://blog.zzsqwq.cn/posts/how-to-use-clash-on-linux/">如何在 Linux 上优雅的使用 Clash？</a></p><h1 id="为-dockerd-设置网络代理">2. 为 dockerd 设置网络代理</h1><p>“docker pull” 命令是由 dockerd 守护进程执行。而 dockerd 守护进程是由 systemd 管理。因此，如果需要在执行 “docker pull” 命令时使用 HTTP/HTTPS 代理，需要通过 systemd 配置。</p><ul><li>为 dockerd 创建配置文件夹。<figure class="highlight sh"><table><tr><td class="code"><pre><span class="line"><span class="built_in">sudo</span> <span class="built_in">mkdir</span> -p /etc/systemd/system/docker.service.d</span><br></pre></td></tr></table></figure></li><li>为 dockerd 创建 HTTP/HTTPS 网络代理的配置文件，文件路径是 /etc/systemd/system/docker.service.d/http-proxy.conf 。并在该文件中添加相关环境变量。<figure class="highlight plaintext"><table><tr><td class="code"><pre><span class="line">[Service]</span><br><span class="line">Environment=&quot;HTTP_PROXY=http://proxy.example.com:8080/&quot;</span><br><span class="line">Environment=&quot;HTTPS_PROXY=http://proxy.example.com:8080/&quot;</span><br><span class="line">Environment=&quot;NO_PROXY=localhost,127.0.0.1,.example.com&quot;</span><br></pre></td></tr></table></figure></li><li>刷新配置并重启 docker 服务。<figure class="highlight sh"><table><tr><td class="code"><pre><span class="line"><span class="built_in">sudo</span> systemctl daemon-reload</span><br><span class="line"><span class="built_in">sudo</span> systemctl restart docker</span><br></pre></td></tr></table></figure></li></ul><h1 id="为-docker-容器设置网络代理">3. 为 docker 容器设置网络代理</h1><p>在容器运行阶段，如果需要使用 HTTP/HTTPS 代理，可以通过更改 docker 客户端配置，或者指定环境变量的方式。</p><ul><li>更改 docker 客户端配置：创建或更改 ~/.docker/config.json，并在该文件中添加相关配置。<figure class="highlight json"><table><tr><td class="code"><pre><span class="line"><span class="punctuation">&#123;</span></span><br><span class="line"> <span class="attr">&quot;proxies&quot;</span><span class="punctuation">:</span></span><br><span class="line"> <span class="punctuation">&#123;</span></span><br><span class="line">   <span class="attr">&quot;default&quot;</span><span class="punctuation">:</span></span><br><span class="line">   <span class="punctuation">&#123;</span></span><br><span class="line">     <span class="attr">&quot;httpProxy&quot;</span><span class="punctuation">:</span> <span class="string">&quot;http://proxy.example.com:8080/&quot;</span><span class="punctuation">,</span></span><br><span class="line">     <span class="attr">&quot;httpsProxy&quot;</span><span class="punctuation">:</span> <span class="string">&quot;http://proxy.example.com:8080/&quot;</span><span class="punctuation">,</span></span><br><span class="line">     <span class="attr">&quot;noProxy&quot;</span><span class="punctuation">:</span> <span class="string">&quot;localhost,127.0.0.1,.example.com&quot;</span></span><br><span class="line">   <span class="punctuation">&#125;</span></span><br><span class="line"> <span class="punctuation">&#125;</span></span><br><span class="line"><span class="punctuation">&#125;</span></span><br></pre></td></tr></table></figure></li><li>指定环境变量：运行 “docker run” 命令时，指定相关环境变量。<figure class="highlight sh"><table><tr><td class="code"><pre><span class="line">docker run --<span class="built_in">env</span> HTTP_PROXY=<span class="string">&quot;http://proxy.example.com:8080/ --env HTTPS_PROXY=&quot;</span>http://proxy.example.com:8080/<span class="string">&quot; --env NO_PROXY=&quot;</span>localhost,127.0.0.1,.example.com<span class="string">&quot;</span></span><br></pre></td></tr></table></figure></li></ul><h1 id="为-docker-build-过程设置网络代理">4. 为 docker build 过程设置网络代理</h1><p>在容器构建阶段，如果需要使用 HTTP/HTTPS 代理，可以通过指定 “docker build” 的环境变量，或者在 Dockerfile 中指定环境变量的方式。</p><ul><li>使用 “–build-arg” 指定 “docker build” 的相关环境变量<figure class="highlight plaintext"><table><tr><td class="code"><pre><span class="line">docker build \</span><br><span class="line">    --build-arg &quot;HTTP_PROXY=http://proxy.example.com:8080/&quot; \</span><br><span class="line">    --build-arg &quot;HTTPS_PROXY=http://proxy.example.com:8080/&quot; \</span><br><span class="line">    --build-arg &quot;NO_PROXY=localhost,127.0.0.1,.example.com&quot; .</span><br></pre></td></tr></table></figure></li></ul><h1 id="更多docker教程">5. 更多docker教程</h1><ul><li><a href="https://yeasy.gitbook.io/docker_practice/">Docker从入门到实践</a></li></ul>]]></content>
    
    
    <summary type="html">&lt;h1 id=&quot;在linux下部署clash&quot;&gt;1. 在linux下部署clash&lt;/h1&gt;&lt;p&gt;&lt;a href=&quot;https://blog.zzsqwq.cn/posts/how-to-use-clash-on-linux/&quot;&gt;如何在 Linux 上优雅的使用 Clash？&lt;/a&gt;&lt;/p&gt;
&lt;h1 id=&quot;为-dockerd-设置网络代理&quot;&gt;2. 为 dockerd 设置网络代理&lt;/h1&gt;&lt;p&gt;“docker pull” 命令是由 dockerd 守护进程执行。而 dockerd 守护进程是由 systemd 管理。因此，如果需要在执行 “docker pull” 命令时使用 HTTP/HTTPS 代理，需要通过 systemd 配置。&lt;/p&gt;
&lt;ul&gt;
&lt;li&gt;为 dockerd 创建配置文件夹。&lt;figure class=&quot;highlight sh&quot;&gt;&lt;table&gt;&lt;tr&gt;&lt;td class=&quot;code&quot;&gt;&lt;pre&gt;&lt;span class=&quot;line&quot;&gt;&lt;span class=&quot;built_in&quot;&gt;sudo&lt;/span&gt; &lt;span class=&quot;built_in&quot;&gt;mkdir&lt;/span&gt; -p /etc/systemd/system/docker.service.d&lt;/span&gt;&lt;br&gt;&lt;/pre&gt;&lt;/td&gt;&lt;/tr&gt;&lt;/table&gt;&lt;/figure&gt;&lt;/li&gt;
&lt;li&gt;为 dockerd 创建 HTTP/HTTPS 网络代理的配置文件，文件路径是 /etc/systemd/system/docker.service.d/http-proxy.conf 。并在该文件中添加相关环境变量。&lt;figure class=&quot;highlight plaintext&quot;&gt;&lt;table&gt;&lt;tr&gt;&lt;td class=&quot;code&quot;&gt;&lt;pre&gt;&lt;span class=&quot;line&quot;&gt;[Service]&lt;/span&gt;&lt;br&gt;&lt;span class=&quot;line&quot;&gt;Environment=&amp;quot;HTTP_PROXY=http://proxy.example.com:8080/&amp;quot;&lt;/span&gt;&lt;br&gt;&lt;span class=&quot;line&quot;&gt;Environment=&amp;quot;HTTPS_PROXY=http://proxy.example.com:8080/&amp;quot;&lt;/span&gt;&lt;br&gt;&lt;span class=&quot;line&quot;&gt;Environment=&amp;quot;NO_PROXY=localhost,127.0.0.1,.example.com&amp;quot;&lt;/span&gt;&lt;br&gt;&lt;/pre&gt;&lt;/td&gt;&lt;/tr&gt;&lt;/table&gt;&lt;/figure&gt;&lt;/li&gt;
&lt;li&gt;刷新配置并重启 docker 服务。&lt;figure class=&quot;highlight sh&quot;&gt;&lt;table&gt;&lt;tr&gt;&lt;td class=&quot;code&quot;&gt;&lt;pre&gt;&lt;span class=&quot;line&quot;&gt;&lt;span class=&quot;built_in&quot;&gt;sudo&lt;/span&gt; systemctl daemon-reload&lt;/span&gt;&lt;br&gt;&lt;span class=&quot;line&quot;&gt;&lt;span class=&quot;built_in&quot;&gt;sudo&lt;/span&gt; systemctl restart docker&lt;/span&gt;&lt;br&gt;&lt;/pre&gt;&lt;/td&gt;&lt;/tr&gt;&lt;/table&gt;&lt;/figure&gt;&lt;/li&gt;
&lt;/ul&gt;
&lt;h1 id=&quot;为-docker-容器设置网络代理&quot;&gt;3. 为 docker 容器设置网络代理&lt;/h1&gt;&lt;p&gt;在容器运行阶段，如果需要使用 HTTP/HTTPS 代理，可以通过更改 docker 客户端配置，或者指定环境变量的方式。&lt;/p&gt;</summary>


    <category term="linux" scheme="http://blog.coding1024.com/categories/linux/"/>
    
    
    <category term="linux" scheme="http://blog.coding1024.com/tags/linux/"/>
    
  </entry>
  
  <entry>
    <title>从LightShowCreator导出xLights项目</title>
    <link href="http://blog.coding1024.com/posts/4ac7aace/"/>
    <id>http://blog.coding1024.com/posts/4ac7aace/</id>
    <published>2023-08-02T15:52:41.000Z</published>
    <updated>2026-05-30T02:35:53.567Z</updated>
    
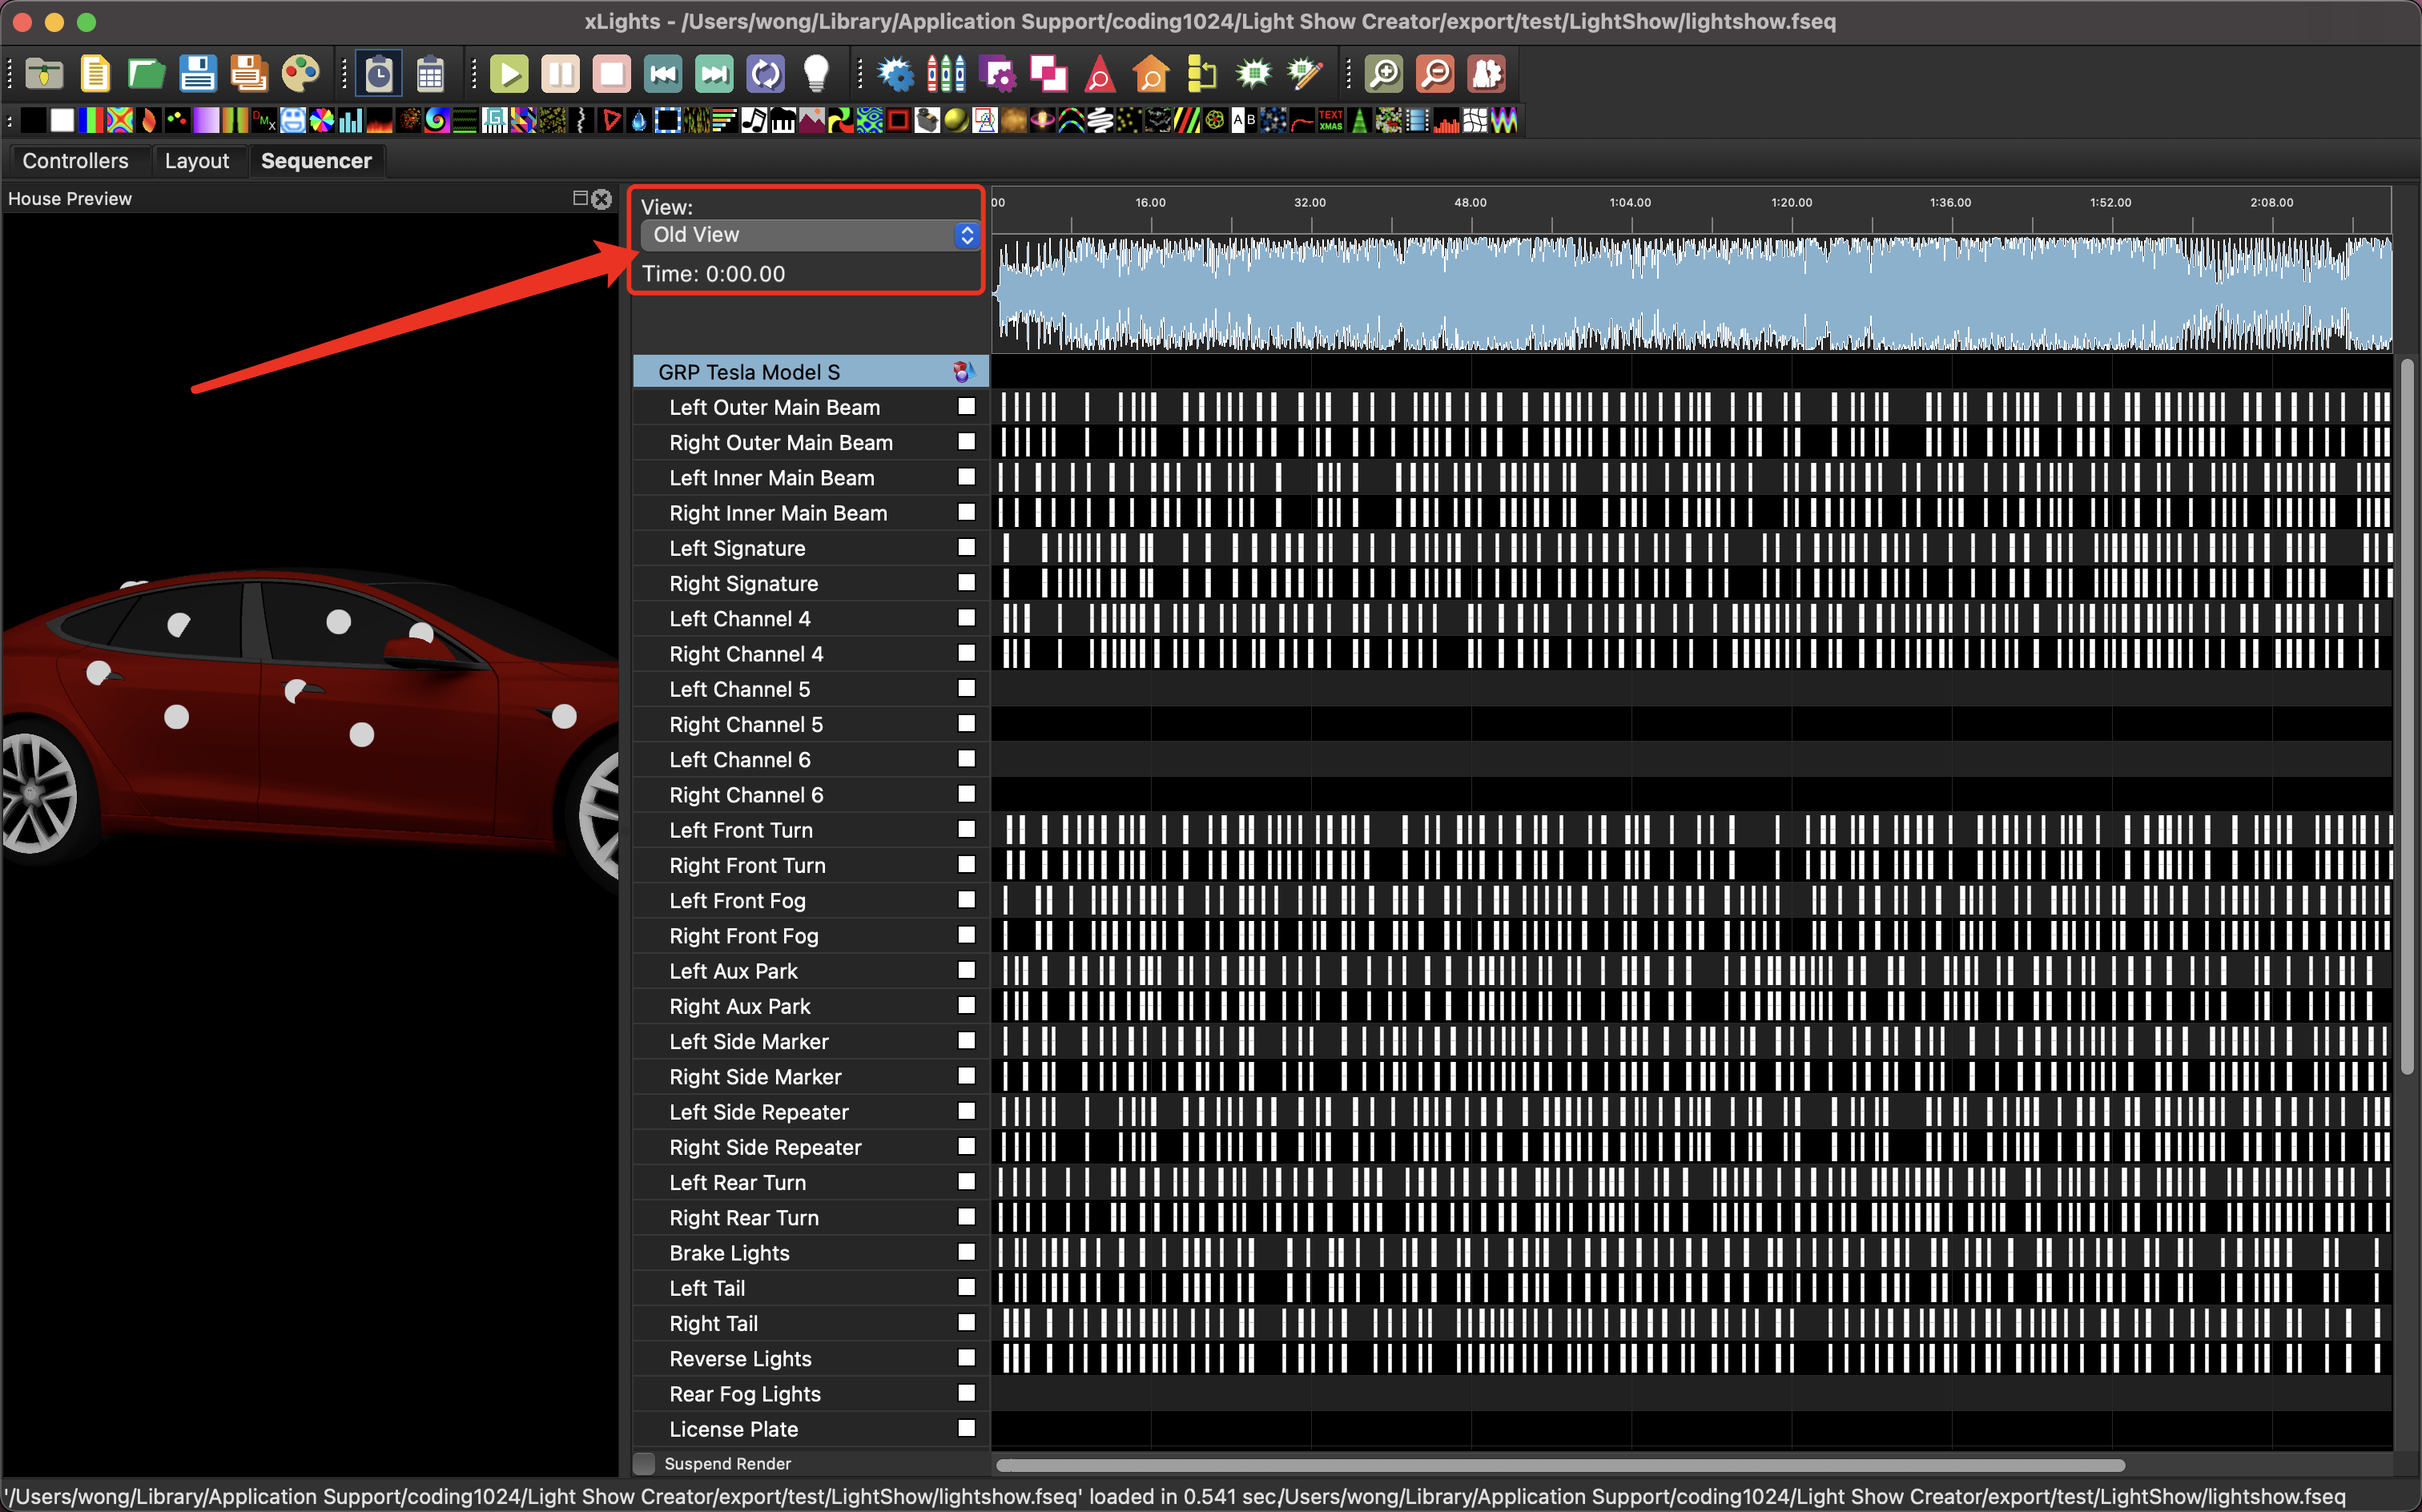
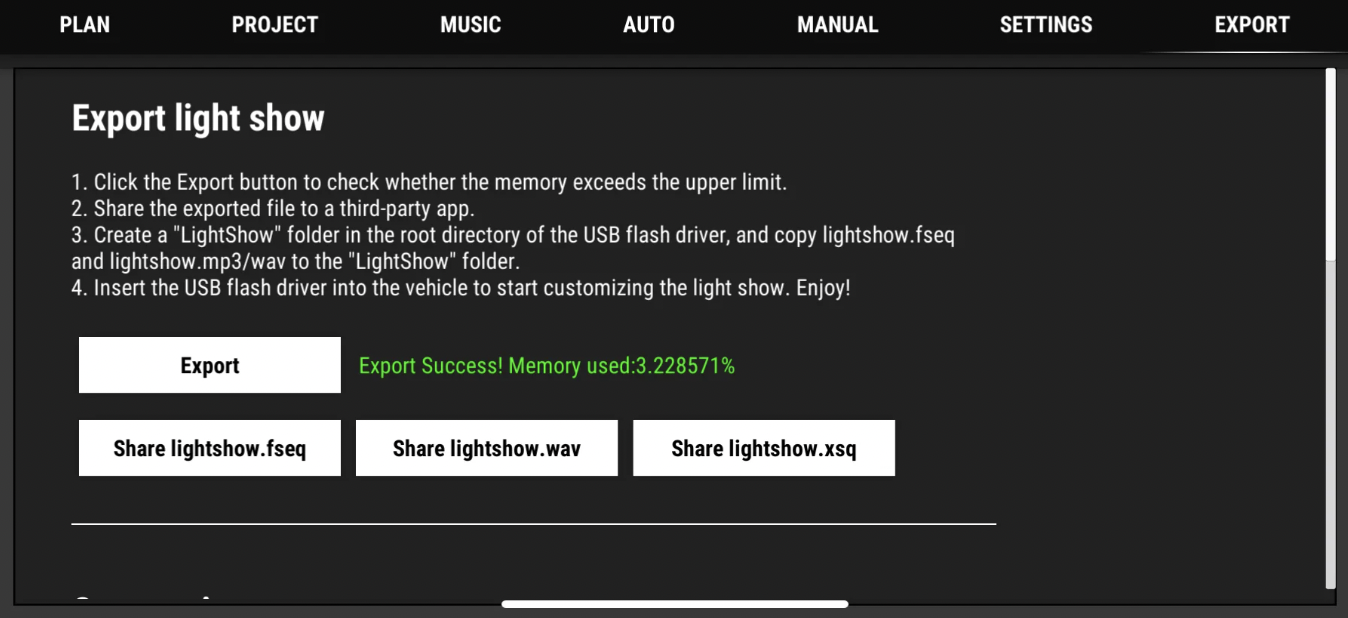
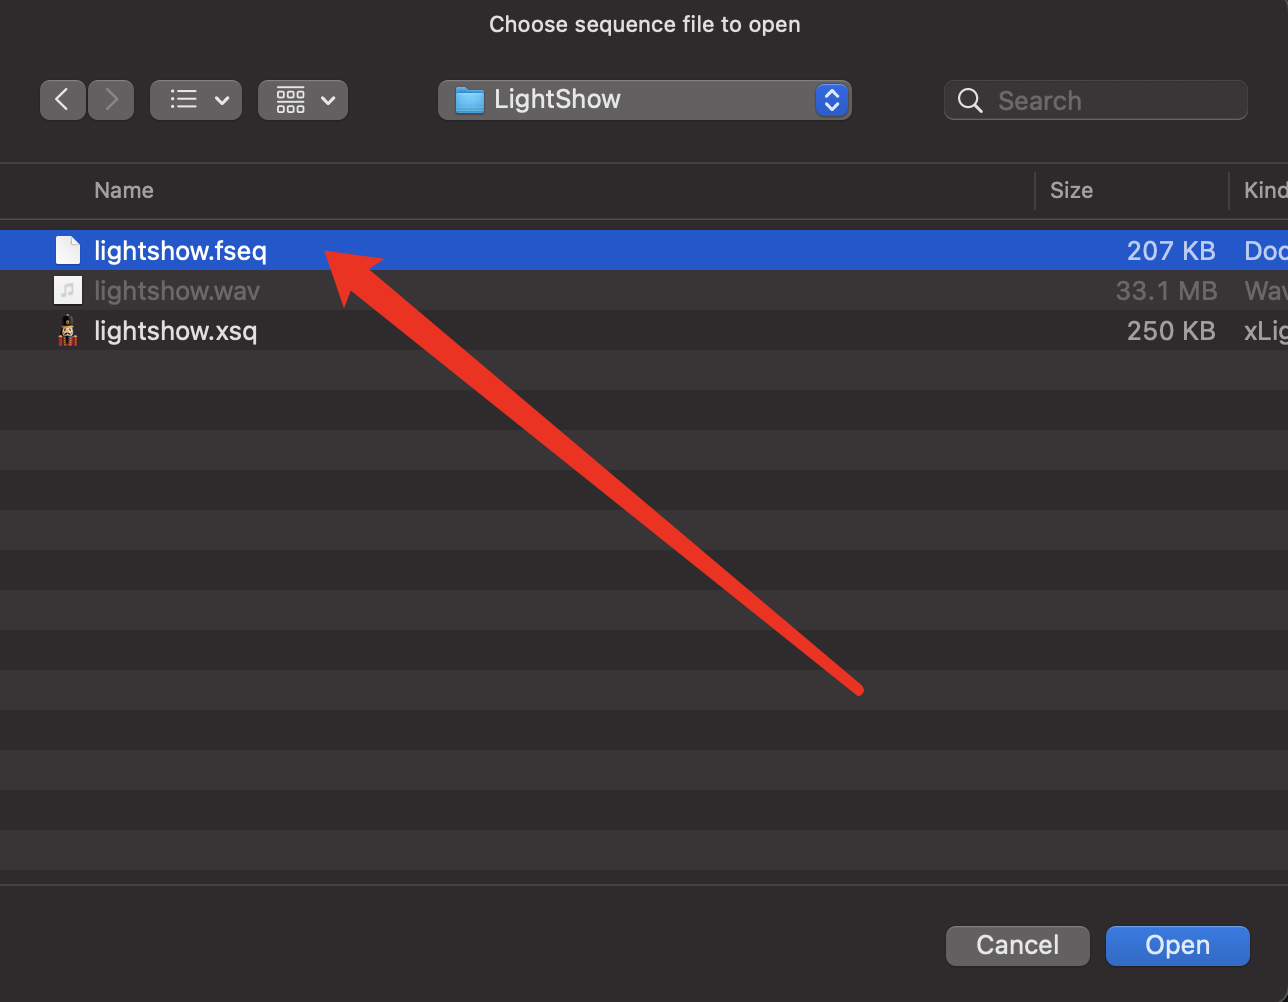
    <content type="html"><![CDATA[<p>大家好，今天我给大家分享一个超实用的教程，教你如何从LightShowCreator导出xLights项目，让你的特斯拉灯光秀更加个性化！我们都知道xLights可以自定义非常酷炫的灯光秀，但是操作起来可能有些繁琐。因此，我开发了一款自动生成灯光秀的APP，让你轻松制作特斯拉灯光秀。</p><p>不少用户建议我给LightShowCreator添加类似xLights的时间轴来编辑帧，但我深思熟虑后认为，LightShowCreator的宗旨是以娱乐化和简单化为主，添加时间轴可能会让APP变得臃肿，而且在手机上难以实现与xLights一样的精细操作。考虑到这部分用户的需求，我在LightShowCreator中加入了导出xsq文件的功能，完全兼容xLights。<br><img src="/posts/4ac7aace/manual-02.png"></p><p>下面是具体的教程：</p><ol><li><p>在LightShowCreator中，先导入你喜欢的音乐，并使用自动模式或者手动模式生成灯光秀。导出时会得到三个文件：lightshow.wav、lightshow.fseq和lightshow.xsq。将这三个文件拷贝到电脑的同一个文件夹备用。<br><img src="/posts/4ac7aace/export-01.png"></p></li><li><p>打开xLights软件，请务必下载最新版本的xLights和特斯拉开源项目的最新工程文件。目前APP导出的xsq适配的是Apr 27, 2023提交的版本。你可以从此链接下载：<a href="https://github.com/teslamotors/light-show/blob/09601c577f838e84320faff8ea3a7266af783f56/xlights/tesla_xlights_show_folder.zip">https://github.com/teslamotors/light-show/blob/09601c577f838e84320faff8ea3a7266af783f56/xlights/tesla_xlights_show_folder.zip</a><br><img src="/posts/4ac7aace/xLights-select-file.png"></p></li><li><p>在xLights中点击“文件(File)”-&gt;“打开序列(Open Sequence)”，选择LightShowCreator导出的lightshow.fseq文件。请务必确保打开的是lightshow.fseq，而不是lightshow.xsq。之后在View下拉菜单选择OldView，你会发现xLights里已经出现了很多自动生成的帧，接下来你可以用xLights进行更加精细的编辑。<br><img src="/posts/4ac7aace/xLights-select-oldview.png"></p></li></ol><p>如果在导入时遇到问题，请务必注意以下几点：</p><ol><li>将LightShowCreator导出的三个文件放到同一个文件夹中（mp3/wav，fseq和xsq）。</li><li>确保你用的xLights版本是从Github上下载的2023年最新版本(<a href="https://github.com/teslamotors/light-show)%E3%80%82%E4%BD%BF%E7%94%A82021%E5%B9%B4%E7%89%88%E6%9C%AC%E5%8F%AF%E8%83%BD%E4%BC%9A%E5%AF%BC%E8%87%B4%E4%B8%8D%E5%85%BC%E5%AE%B9%E7%9A%84%E6%83%85%E5%86%B5%E3%80%82">https://github.com/teslamotors/light-show)。使用2021年版本可能会导致不兼容的情况。</a></li><li>在导入时选择”lightshow.fseq”，而不是”lightshow.xsq”，否则可能会出现警告并丢失数据。</li></ol><p>希望这个教程对你有帮助，享受制作特斯拉灯光秀的乐趣吧！如果你还有其他问题或需求，随时联系我，期待你的反馈和精彩灯光秀作品！</p>]]></content>
    
    
    <summary type="html">&lt;p&gt;大家好，今天我给大家分享一个超实用的教程，教你如何从LightShowCreator导出xLights项目，让你的特斯拉灯光秀更加个性化！我们都知道xLights可以自定义非常酷炫的灯光秀，但是操作起来可能有些繁琐。因此，我开发了一款自动生成灯光秀的APP，让你轻松制作特斯拉灯光秀。&lt;/p&gt;
&lt;p&gt;不少用户建议我给LightShowCreator添加类似xLights的时间轴来编辑帧，但我深思熟虑后认为，LightShowCreator的宗旨是以娱乐化和简单化为主，添加时间轴可能会让APP变得臃肿，而且在手机上难以实现与xLights一样的精细操作。考虑到这部分用户的需求，我在LightShowCreator中加入了导出xsq文件的功能，完全兼容xLights。&lt;br&gt;&lt;img src=&quot;/posts/4ac7aace/manual-02.png&quot;&gt;&lt;/p&gt;
&lt;p&gt;下面是具体的教程：&lt;/p&gt;
&lt;ol&gt;
&lt;li&gt;&lt;p&gt;在LightShowCreator中，先导入你喜欢的音乐，并使用自动模式或者手动模式生成灯光秀。导出时会得到三个文件：lightshow.wav、lightshow.fseq和lightshow.xsq。将这三个文件拷贝到电脑的同一个文件夹备用。&lt;br&gt;&lt;img src=&quot;/posts/4ac7aace/export-01.png&quot;&gt;&lt;/p&gt;
&lt;/li&gt;
&lt;li&gt;&lt;p&gt;打开xLights软件，请务必下载最新版本的xLights和特斯拉开源项目的最新工程文件。目前APP导出的xsq适配的是Apr 27, 2023提交的版本。你可以从此链接下载：&lt;a href=&quot;https://github.com/teslamotors/light-show/blob/09601c577f838e84320faff8ea3a7266af783f56/xlights/tesla_xlights_show_folder.zip&quot;&gt;https://github.com/teslamotors/light-show/blob/09601c577f838e84320faff8ea3a7266af783f56/xlights/tesla_xlights_show_folder.zip&lt;/a&gt;&lt;br&gt;&lt;img src=&quot;/posts/4ac7aace/xLights-select-file.png&quot;&gt;&lt;/p&gt;
&lt;/li&gt;
&lt;li&gt;&lt;p&gt;在xLights中点击“文件(File)”-&amp;gt;“打开序列(Open Sequence)”，选择LightShowCreator导出的lightshow.fseq文件。请务必确保打开的是lightshow.fseq，而不是lightshow.xsq。之后在View下拉菜单选择OldView，你会发现xLights里已经出现了很多自动生成的帧，接下来你可以用xLights进行更加精细的编辑。&lt;br&gt;&lt;img src=&quot;/posts/4ac7aace/xLights-select-oldview.png&quot;&gt;&lt;/p&gt;
&lt;/li&gt;
&lt;/ol&gt;
&lt;p&gt;如果在导入时遇到问题，请务必注意以下几点：&lt;/p&gt;
&lt;ol&gt;
&lt;li&gt;将LightShowCreator导出的三个文件放到同一个文件夹中（mp3/wav，fseq和xsq）。&lt;/li&gt;
&lt;li&gt;确保你用的xLights版本是从Github上下载的2023年最新版本(&lt;a href=&quot;https://github.com/teslamotors/light-show)%E3%80%82%E4%BD%BF%E7%94%A82021%E5%B9%B4%E7%89%88%E6%9C%AC%E5%8F%AF%E8%83%BD%E4%BC%9A%E5%AF%BC%E8%87%B4%E4%B8%8D%E5%85%BC%E5%AE%B9%E7%9A%84%E6%83%85%E5%86%B5%E3%80%82&quot;&gt;https://github.com/teslamotors/light-show)。使用2021年版本可能会导致不兼容的情况。&lt;/a&gt;&lt;/li&gt;
&lt;li&gt;在导入时选择”lightshow.fseq”，而不是”lightshow.xsq”，否则可能会出现警告并丢失数据。&lt;/li&gt;
&lt;/ol&gt;
&lt;p&gt;希望这个教程对你有帮助，享受制作特斯拉灯光秀的乐趣吧！如果你还有其他问题或需求，随时联系我，期待你的反馈和精彩灯光秀作品！&lt;/p&gt;</summary>


    <category term="tesla" scheme="http://blog.coding1024.com/categories/tesla/"/>
    
    
    <category term="tesla" scheme="http://blog.coding1024.com/tags/tesla/"/>
    
    <category term="Light Show Creator" scheme="http://blog.coding1024.com/tags/Light-Show-Creator/"/>
    
  </entry>
  
  <entry>
    <title>Light Show Creator 使用手册</title>
    <link href="http://blog.coding1024.com/posts/4ca667d5/"/>
    <id>http://blog.coding1024.com/posts/4ca667d5/</id>
    <published>2023-07-29T16:32:22.000Z</published>
    <updated>2026-05-30T02:35:53.548Z</updated>
    
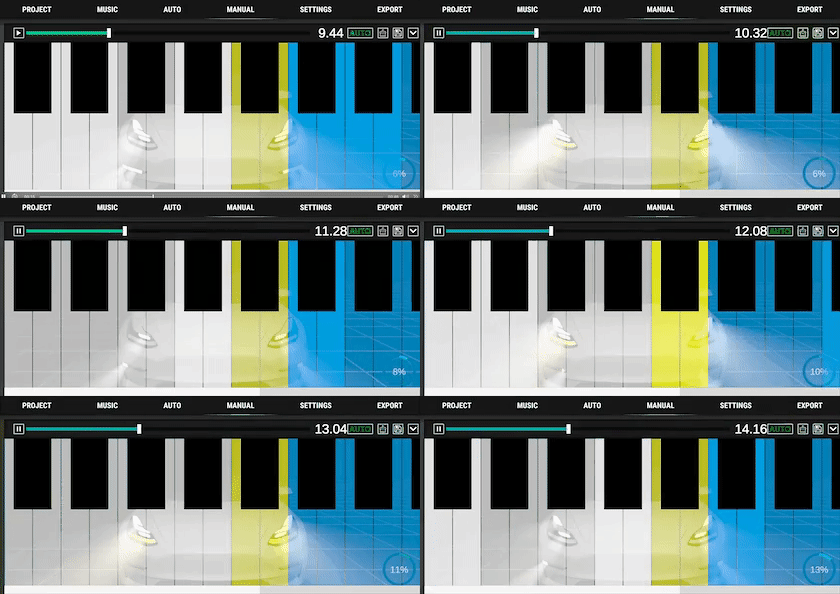
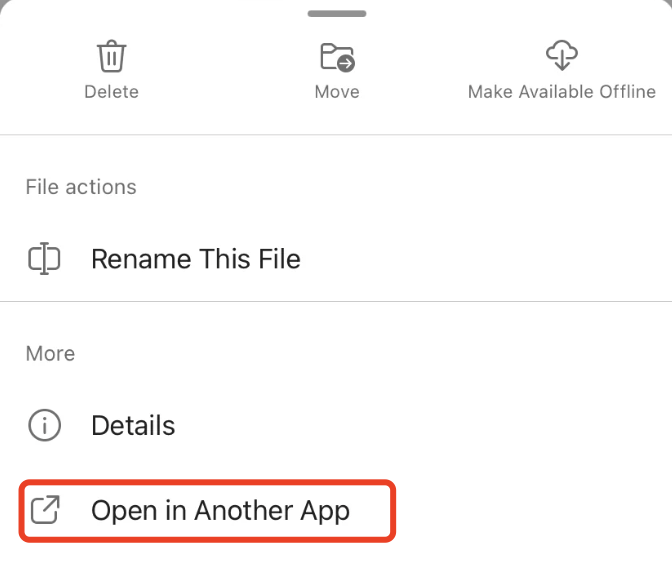
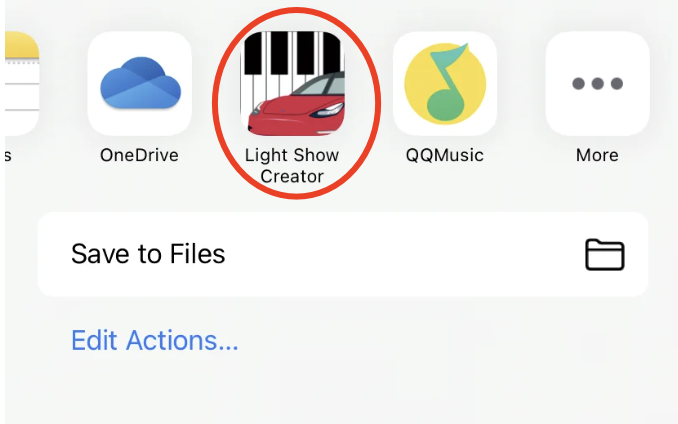
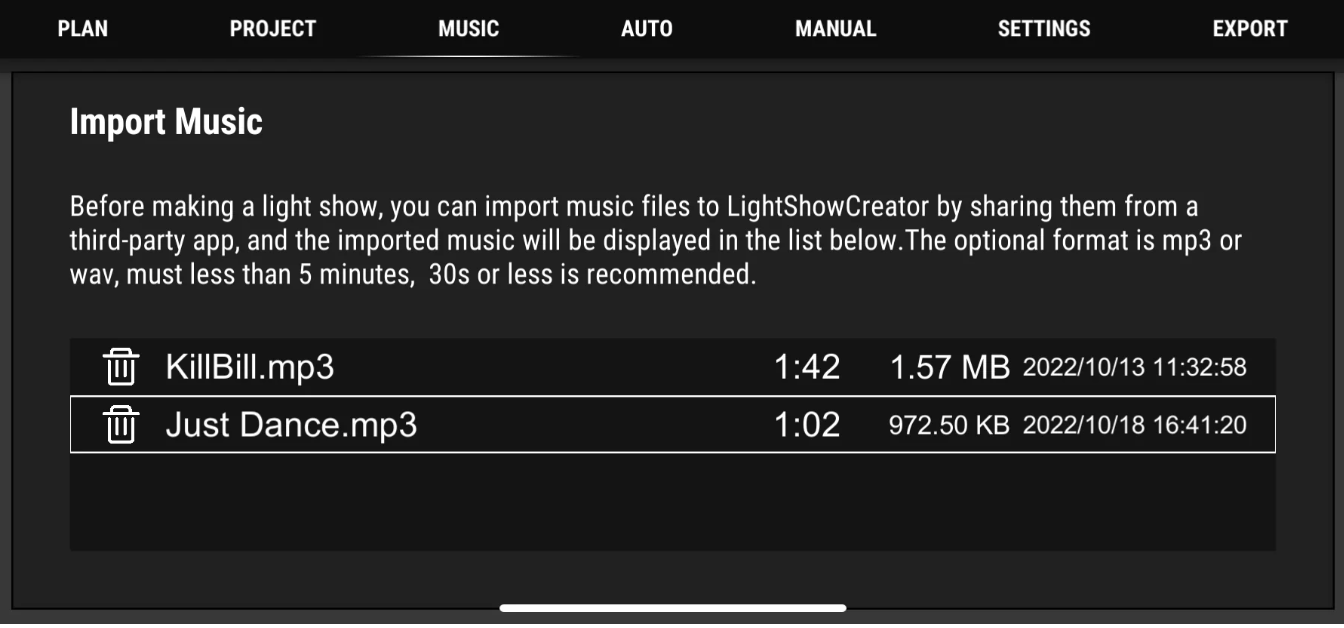
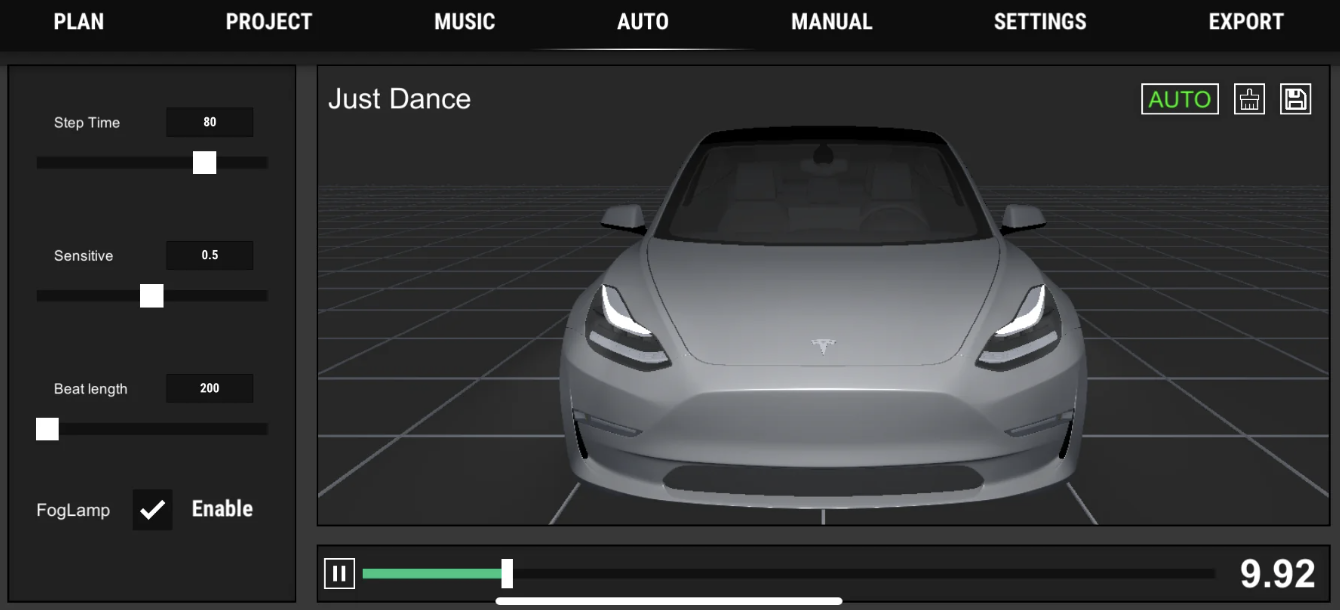
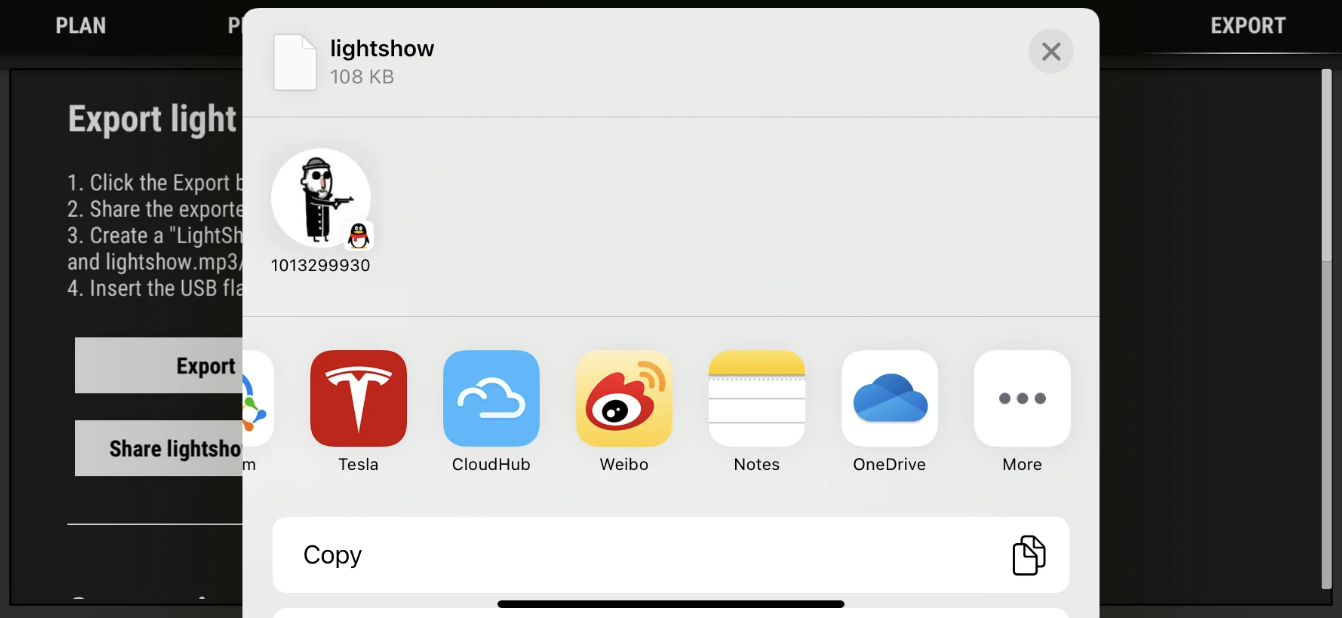
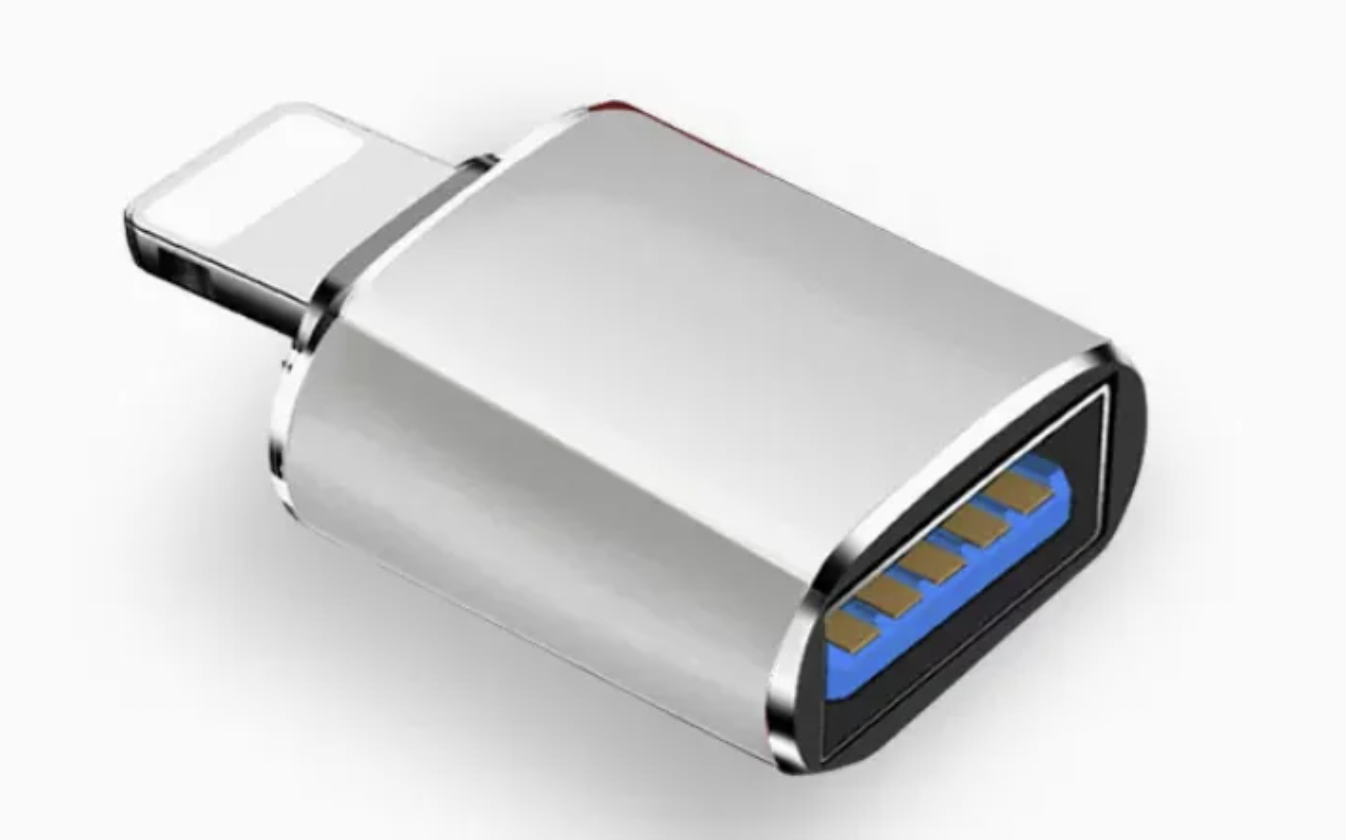
    <content type="html"><![CDATA[<p>自定义灯光秀是特斯拉汽车的一项很酷的功能。 LightShowCreator是一款可以快速轻松制作灯光秀的APP。 如果您对它感兴趣，您也可以尝试用它来定制你自己的节目。</p><ul><li><a href="https://apps.apple.com/us/app/light-show-creator/id6446385602">App Store</a></li><li><a href="https://apps.apple.com/us/app/light-show-creator/id6446385602">Google Play</a></li><li><a href="https://www.microsoft.com/store/productId/9PL28B7M856D">Microsoft Store</a></li></ul><p><img src="/posts/4ca667d5/preview.gif"></p><h1 id="U盘要求">1. U盘要求</h1><ul><li>必须包含一个名为“LightShow”的基本文件夹（解压从该项目下载的 LightShow.zip）</li><li>必须格式化为 exFAT、FAT 32（适用于 Windows）、MS-DOS FAT（适用于 Mac）、ext3 或 ext4。 当前不支持 NTFS。</li><li>根目录不得包含的 TeslaCam 文件夹。</li></ul><p>特斯拉官方指南: <a href="https://github.com/teslamotors/light-show">https://github.com/teslamotors/light-show</a></p><h1 id="如何创建新项目">2. 如何创建新项目</h1><p>打开“项目”页面，点击“新建项目”按钮，输入项目名称</p><h1 id="如何导入音乐">3. 如何导入音乐</h1><p>关于格式选择，虽然有mp3和wav两种格式，这里建议尽量使用wav，部分mp3格式会有问题。</p><h2 id="Android">3.1. Android</h2><p>如果您的系统是Android，您可直接从文件系统里选择一首不超于5分钟的mp3或者wav文件来导入。</p><h2 id="IOS">3.2. IOS</h2><p>如果您的系统是IOS，您有两种导入音乐的方法：</p><ul><li>将第三方APP的音乐分享到本APP</li><li>将音乐复制到LightShowCreator目录</li></ul><p>下面是具体例子：</p><p>通过复制导入音乐<br>您需要使用苹果官方APP“文件”进行管理。 如果您的设备中没有安装“文件”，您可以前往Appstore获取</p><p><img src="/posts/4ca667d5/files-app.png"></p><p>打开“文件”APP后，点击“我的iPhone”<br><img src="/posts/4ca667d5/paths.png"></p><p>点击“LightShowCreator”目录<br><img src="/posts/4ca667d5/creator-path.png"></p><p>在“LightShowCreator”目录中，“music”是存放导入音乐的目录，将音乐复制到这里即可。<br><img src="/posts/4ca667d5/main-dir.png"></p><p>上一步点击分享后，系统会切换到Light Show Creator，点击“音乐”页面，几秒钟之内你选择的音乐就会出现在这个列表中。</p><p><img src="/posts/4ca667d5/music-01.png"></p><h1 id="通过第三方APP分享音乐">4. 通过第三方APP分享音乐</h1><p>任何支持文件共享功能的第三方APP，例如OneDrive、GoogleDrive、Dropbox等。</p><p><img src="/posts/4ca667d5/share-01.png"><br>单击“使用其他应用程序打开”并选择 LightShowCreator。<br><img src="/posts/4ca667d5/share-02.png"></p><p>之后音乐将出现在列表中。 现在点击你想要使用的音乐，到这里，音乐导入就完成了<br><img src="/posts/4ca667d5/select-music.png"></p><h1 id="如何使用自动模式">5. 如何使用自动模式</h1><p>自动模式的使用非常简单，只需点亮“自动”按钮，灯光就会根据音乐的节奏自动点亮。<br><img src="/posts/4ca667d5/auto.png"></p><p>您还可以调整一些参数：</p><ul><li>Step time：每帧的持续时间，越大越节省内存</li><li>节奏敏感度：对音乐节奏的敏感程度，理论上内存越小越少</li><li>节拍时间：每次灯亮的最大时间，越大越节省内存</li><li>雾灯开关（标配续Model 3和Model Y没有前雾灯，关闭此选项会更有效）</li></ul><h1 id="如何使用手动模式">6. 如何使用手动模式</h1><p>手动模式可以进行更加个性化的编辑，就像弹钢琴一样，非常简单。 两个对称的车灯为一组，黑键同时点亮，白键在声音一侧点亮。<br><img src="/posts/4ca667d5/manual-01.png"></p><p>手动录制的同时，还可以启动自动模式，只需要自己控制几个关键灯即可。</p><p><img src="/posts/4ca667d5/manual-02.png"></p><h1 id="如何导出灯光秀文件">7. 如何导出灯光秀文件</h1><p>导出灯光秀的原理与导入音乐相同，也是通过分享功能发送到第三方App。 我们以 OneDrive 为例：</p><p><img src="/posts/4ca667d5/export-01.png"><br><img src="/posts/4ca667d5/export-02.png"><br><img src="/posts/4ca667d5/export-03.png"><br>另外，灯光秀文件也会导出到文件系统中。 在IOS中，导出路径为：“LightShowCreator/export/”，而在Android中，导出路径为：“Downloads/LightShowExport/”。</p><p>如果你想抛弃电脑设备，随时随地用手机打造灯光秀，那么我强烈建议你购买一个lighting或者type-c to usb转接头，像这样：<br><img src="/posts/4ca667d5/export-04.png"></p><h1 id="如何使用-xLights-进行更精细的编辑">8. 如何使用 xLights 进行更精细的编辑</h1><p>目前我们的APP不支持渐变效果和门窗控制。 如果您有这个需求，可以将lightshow.wav/mp3、lightshow.fseq、lightshow.xsq这三个文件放到PC设备的同一目录下，然后用xLights打开。</p><h1 id="Q-amp-A">9. Q&amp;A</h1><h3 id="手动模式下，音乐节奏太快跟不上节拍怎么办？">9.0.1. 手动模式下，音乐节奏太快跟不上节拍怎么办？</h3><p>您可以在设置页面设置音乐播放速度</p><h3 id="为什么Windows版本不支持手动模式？">9.0.2. 为什么Windows版本不支持手动模式？</h3><p>windows近期没有更新计划，因为windows不支持触摸屏，这与移动版本有很大不同。</p><h3 id="有没有什么好的办法可以做到多车联动性能">9.0.3. 有没有什么好的办法可以做到多车联动性能</h3><p>我们在后续的版本规划中已经规划了这个功能。 目前有一个建议，你可以将你的音乐分成多个曲目，然后创建多个项目，并使用自动模式的功能，这样你就可以快速创建多个汽车。</p>]]></content>
    
    
    <summary type="html">&lt;p&gt;自定义灯光秀是特斯拉汽车的一项很酷的功能。 LightShowCreator是一款可以快速轻松制作灯光秀的APP。 如果您对它感兴趣，您也可以尝试用它来定制你自己的节目。&lt;/p&gt;
&lt;ul&gt;
&lt;li&gt;&lt;a href=&quot;https://apps.apple.com/us/app/light-show-creator/id6446385602&quot;&gt;App Store&lt;/a&gt;&lt;/li&gt;
&lt;li&gt;&lt;a href=&quot;https://apps.apple.com/us/app/light-show-creator/id6446385602&quot;&gt;Google Play&lt;/a&gt;&lt;/li&gt;
&lt;li&gt;&lt;a href=&quot;https://www.microsoft.com/store/productId/9PL28B7M856D&quot;&gt;Microsoft Store&lt;/a&gt;&lt;/li&gt;
&lt;/ul&gt;
&lt;p&gt;&lt;img src=&quot;/posts/4ca667d5/preview.gif&quot;&gt;&lt;/p&gt;
&lt;h1 id=&quot;U盘要求&quot;&gt;1. U盘要求&lt;/h1&gt;&lt;ul&gt;
&lt;li&gt;必须包含一个名为“LightShow”的基本文件夹（解压从该项目下载的 LightShow.zip）&lt;/li&gt;
&lt;li&gt;必须格式化为 exFAT、FAT 32（适用于 Windows）、MS-DOS FAT（适用于 Mac）、ext3 或 ext4。 当前不支持 NTFS。&lt;/li&gt;
&lt;li&gt;根目录不得包含的 TeslaCam 文件夹。&lt;/li&gt;
&lt;/ul&gt;
&lt;p&gt;特斯拉官方指南: &lt;a href=&quot;https://github.com/teslamotors/light-show&quot;&gt;https://github.com/teslamotors/light-show&lt;/a&gt;&lt;/p&gt;
&lt;h1 id=&quot;如何创建新项目&quot;&gt;2. 如何创建新项目&lt;/h1&gt;</summary>


    <category term="tesla" scheme="http://blog.coding1024.com/categories/tesla/"/>
    
    
    <category term="tesla" scheme="http://blog.coding1024.com/tags/tesla/"/>
    
    <category term="Light Show Creator" scheme="http://blog.coding1024.com/tags/Light-Show-Creator/"/>
    
  </entry>
  
  <entry>
    <title>Unity接入IAP内购支付</title>
    <link href="http://blog.coding1024.com/posts/784a9c64/"/>
    <id>http://blog.coding1024.com/posts/784a9c64/</id>
    <published>2023-04-11T15:22:39.000Z</published>
    <updated>2026-05-30T02:35:53.612Z</updated>
    
    <content type="html"><![CDATA[<h1 id="Google-Play">1. Google Play</h1><h2 id="上传一个带BILLING权限的包">1.1. 上传一个带BILLING权限的包</h2><p>在AndroidMainfest.xml加入</p><figure class="highlight xml"><table><tr><td class="code"><pre><span class="line"><span class="tag">&lt;<span class="name">uses-permission</span> <span class="attr">android:name</span>=<span class="string">&quot;com.android.vending.BILLING&quot;</span> /&gt;</span></span><br></pre></td></tr></table></figure><p>上传APK审核通过后，在Google Play Console 创建商店，或订阅项目</p><h2 id="安装Unity-IAP">1.2. 安装Unity IAP</h2><p>Window -&gt; Package Manager -&gt; Unity Registry</p><p>选择In App Purchasing安装</p><h2 id="检查Unity-Player-设置：">1.3. 检查Unity Player 设置：</h2><p>在 Unity 编辑器中，转到 Edit -&gt; Project Settings -&gt; Player。</p><ul><li>在 Other Settings 部分，确保你的 Scripting Backend 设置为 IL2CPP（在大多数情况下是推荐的）。</li><li>在 Configuration 部分，确保 API Compatibility Level 设置为 .NET Standard 2.0 或更高版本。</li><li>确保包名对的上</li><li>勾选Build App Bundle(GooglePlay)</li></ul><h2 id="添加Google-License-Key">1.4. 添加Google License Key</h2><p>key在Google Play Console的创收设置页面可找到，在Unity Dashboard的项目设置里的In-app purchase (IAP) settings里设置(不要在Unity里设置，Unity的设置面板可能会有报错，忽视它)</p><h2 id="添加在Google-Play-Console添加测试账号">1.5. 添加在Google Play Console添加测试账号</h2><p>主页-&gt;测试许可-&gt;许可测试人员（自动生成）</p><p>注意，中国区的账号是不能支付的，另外，测试许可不是内测人员，要区分开来。</p><h2 id="测试">1.6. 测试</h2><ul><li>Google Play 需要发布内测版本，从商店下载测试才能生效！</li></ul>]]></content>
    
    
    <summary type="html">&lt;h1 id=&quot;Google-Play&quot;&gt;1. Google Play&lt;/h1&gt;&lt;h2 id=&quot;上传一个带BILLING权限的包&quot;&gt;1.1. 上传一个带BILLING权限的包&lt;/h2&gt;&lt;p&gt;在AndroidMainfest.xml加入&lt;/p&gt;
&lt;figure class=&quot;highlight xml&quot;&gt;&lt;table&gt;&lt;tr&gt;&lt;td class=&quot;code&quot;&gt;&lt;pre&gt;&lt;span class=&quot;line&quot;&gt;&lt;span class=&quot;tag&quot;&gt;&amp;lt;&lt;span class=&quot;name&quot;&gt;uses-permission&lt;/span&gt; &lt;span class=&quot;attr&quot;&gt;android:name&lt;/span&gt;=&lt;span class=&quot;string&quot;&gt;&amp;quot;com.android.vending.BILLING&amp;quot;&lt;/span&gt; /&amp;gt;&lt;/span&gt;&lt;/span&gt;&lt;br&gt;&lt;/pre&gt;&lt;/td&gt;&lt;/tr&gt;&lt;/table&gt;&lt;/figure&gt;
&lt;p&gt;上传APK审核通过后，在Google Play Console 创建商店，或订阅项目&lt;/p&gt;
&lt;h2 id=&quot;安装Unity-IAP&quot;&gt;1.2. 安装Unity IAP&lt;/h2&gt;&lt;p&gt;Window -&amp;gt; Package Manager -&amp;gt; Unity Registry&lt;/p&gt;</summary>


    <category term="Unity" scheme="http://blog.coding1024.com/categories/Unity/"/>
    
    
  </entry>
  
  <entry>
    <title>游戏编程随想</title>
    <link href="http://blog.coding1024.com/posts/52dda49a/"/>
    <id>http://blog.coding1024.com/posts/52dda49a/</id>
    <published>2023-02-21T15:18:19.000Z</published>
    <updated>2026-05-30T02:35:53.612Z</updated>
    
    <content type="html"><![CDATA[<blockquote><p>这段时间赋闲在家，对近些年的工作进行了复盘。工作么多年，一点小心得，分享一下。</p></blockquote><h1 id="如何定义一个能力很强的游戏程序员">1. 如何定义一个能力很强的游戏程序员</h1><ul><li>拥有很强的battle能力，从根本上去说服一个人，改变一个人的看法，让他配合自己的工作，这个非常难（反例:级别压制，我是你是上级，或者我的上级要求这么做），更高阶是做倒知己知彼，站在多方角度考虑，给出靠谱方案。</li><li>具备一定的前瞻性，在设计框架的时候充分考虑到将来的迭代计划，能预计到将来策划可能会提什么样的需求（纵使策划现在矢口否认），在现有的框架下，尽可能快的满足策划的需求。</li><li>独当一面的能力，在项目的某一个方面或者某个模块，做到事无巨细，是团队里最熟悉这一模块的一员，不仅能出色得完成份内工作，还能驱动需求的迭代，给其它岗位的同事提出建议和解决方案。</li><li>工作效率高，善用各类工具或者能自己写一些自动化工具进行编码，测试等。具体体现在，交付速度快，bug少，返工少，加班少。</li><li>攻坚能力，有能解决核心问题，如关键算法，修复致命bug。</li><li>知识面要广，不拘限于某种单一的语言或者技术。每一种语言或者技术都有它擅长的邻域，只要把它用在恰当的地方即可。</li></ul><h1 id="如何定义一个能力很强的主程">2. 如何定义一个能力很强的主程</h1><ul><li>首先应该是一个能力很强的程序员plus</li><li>具备很强的识人能力，在短短的面试阶段，能甄别出真正适合自己团队的人才，所谓的适合不是面试笔试对答如流，而是具备上面说的优秀程序员的特性，或者非常有潜力成为这样的程序。</li><li>合理的安排任务，不把下属当工具人：根据团队成员的特性指派合适的任务，并给予高度自主权，所谓的合适，可能是该程序在某一方面的特长，或者是某一方面的技能需要历练，在出色的完成工作同时能得到能力上的提升。</li><li>把控进度的能力。对于完成策划需求的用时预估要准确，在给下属留有一定缓冲的同时，尽可能早的让策划看到原型。</li><li>对游戏有深刻理解，知道策划最终想要什么，还有他们此时此刻最想要什么。这有助于版本的快速迭代和上面说的进度把控。</li><li>留得往人。给下属争取更多的利益，给下属足够的发展空间。很简单直接，要么钱给够，要么不让人受委屈。 </li></ul><h1 id="关于开源">3. 关于开源</h1><ul><li>代码就像是程序员的底裤，不能随便给人看的。代码开源，就是把自己的内裤扒出来给人看。秀出来的，一定是很屌的东西。</li><li>不能为了开源而开源。开源应该是一个造轮子的过程，这个轮子不能重复造。一定是因为某个项目，或者库，可能会对别人有帮助。不能是说，以前我做了个很牛很牛的项目，现在把它的代码开源，来炫一下技。还有一些通过歪门邪道来骗赞的就不说了。</li><li>开源可以让自己的综合能力得到迅速提高。开源，其实说白了就是相互白嫖的过程。社区里什么牛马蛇神都有，大家共同维护一个项目，无私奉献和拿来主意都能各取所需，大家者有各自的需求。在这里，每设计一个接口，每提供一个功能，都会不由自主的考虑，这是不是大部分人想要的？会不会让项目变能冗余？能不能做的更通用点？扩展性好不好？等等这些问题，我们的自己的闭源项目里是很少思考的。长期以往，就会本能的写出更优质的代码，我们程序员最向往的高内聚，低耦合的代码。</li></ul><h1 id="如何提升业务开发效率-大佬给的建议，实测好评">4. 如何提升业务开发效率(大佬给的建议，实测好评)</h1><ul><li>第一步，对策划对案子。在开三方会议前，先把需求文档过一遍，有疑问的记下来，或者直接找策划问清楚。等到开三方的时候，与策划逐行对需求文档，把所有的疑问都解决掉。(这一步很重要)</li><li>第二步，与策划一起商定配置表的字段和格式，要求策划配一些能覆盖测试的临时数据，定好之后，写好导表检查。(这一步非常重要，当配置表搞定之后，整个数据模型已经完整的呈现在你的脑海里)</li><li>第三步，前后端沟通定协议。后端还要定一下要落地的数据库结构。这一步，前后端的通讯和交互也定了一下来了</li><li>第四步，写测试用例（有条件的话，最好加上这一步，并将其提前到第四位）</li><li>第五步，写代码(这个时候你对整个系统的需求已经了如指撑了，闭着眼都能写)</li><li>第六步，交付测试，然后愉快的摸鱼</li></ul><h1 id="如何看待加班">5. 如何看待加班</h1><ul><li>没人会喜欢加班，但是身处游戏行业，又不得不加班。加班通常是为了实现一个共同的目标，比如在某一个时间点完成某一个版本，而团队里的每一个成员都必须在场。</li><li>加班其实是能力不足的表现，或者说是在正常上班时间摸鱼造成的。一般来说，人如果全身心投入去工作，从早上9点到晚上9点，会非常非常累。</li><li>只要不是公司制度上强制加班的，我都能接受。虽然加班的时候我大多数情况都在摸鱼，但是摸鱼也可以摸的有价值。比如做一些优化，为将来的版本做准备。</li><li>游戏团队是需要大量的面对面沟通，所以团队成员加班的节奏应该保持一致，不要出现错峰加班的情况，比如有些人加班到很晚，第二天很晚才来，而另一些人刚好错开这个时间，有时候想突然想找人对一下案子，却一直找不到人，卡进度，就很烦。</li></ul><h1 id="其它的一些感想与收获">6. 其它的一些感想与收获</h1><ul><li>技术专家是团队的加分项，但不是必选项。不是交付为目的的技术研究都是耍流氓。</li><li>代码一定要简洁易懂，最好是，非程序岗的同事，能看的懂你的代码，并能从你的代码找出bug。</li><li>游戏行业发展到现如今，除非是在前沿开路的大佬们，绝大部分我们在开发的过程遇到的问题都是有标准答案的，不管是策划还是程序的方案，只要是脱离了主流的解决方案的，一定要留个心眼，你能想到的，别人一定有想过，别人为什么最终没有这么做，那他一定是踩到了什么坑。</li><li>当你发现很久之前代码有一段匪夷所思的代码，别着急删掉，代码是不会说谎的，一定是产品/策划在作妖。</li><li>备注是什么，不需要的，代码本身就是最好的备注。(除了有些地方是特殊处理，临时代码，还是要写一下备注，至少//TODO，否则被喷)</li><li>程序员的本质是什么，程序员的本质就是与计算机沟通的桥梁，我们写的每一行代码，本质上都应该是为了将来减少更多的重复的体力劳动，为此我们可以是大费周章绞尽脑汁也在所不辞。因此，一个程序的优秀特性应该是，勤于动脑，懒于动手。</li><li>切勿过度优化，特别是服务端，有些程序员甚至还在纠结++i和i++比哪个高效，殊不知现在的硬件已经是白菜价了。项目的进度比这些无意义的优化重要多了，除非某些地方成为了瓶颈，否则不要为了优化而优化。</li></ul>]]></content>
    
    
    <summary type="html">&lt;blockquote&gt;
&lt;p&gt;这段时间赋闲在家，对近些年的工作进行了复盘。工作么多年，一点小心得，分享一下。&lt;/p&gt;
&lt;/blockquote&gt;
&lt;h1 id=&quot;如何定义一个能力很强的游戏程序员&quot;&gt;1. 如何定义一个能力很强的游戏程序员&lt;/h1&gt;&lt;ul&gt;
&lt;li&gt;拥有很强的battle能力，从根本上去说服一个人，改变一个人的看法，让他配合自己的工作，这个非常难（反例:级别压制，我是你是上级，或者我的上级要求这么做），更高阶是做倒知己知彼，站在多方角度考虑，给出靠谱方案。&lt;/li&gt;
&lt;li&gt;具备一定的前瞻性，在设计框架的时候充分考虑到将来的迭代计划，能预计到将来策划可能会提什么样的需求（纵使策划现在矢口否认），在现有的框架下，尽可能快的满足策划的需求。&lt;/li&gt;
&lt;li&gt;独当一面的能力，在项目的某一个方面或者某个模块，做到事无巨细，是团队里最熟悉这一模块的一员，不仅能出色得完成份内工作，还能驱动需求的迭代，给其它岗位的同事提出建议和解决方案。&lt;/li&gt;
&lt;li&gt;工作效率高，善用各类工具或者能自己写一些自动化工具进行编码，测试等。具体体现在，交付速度快，bug少，返工少，加班少。&lt;/li&gt;
&lt;li&gt;攻坚能力，有能解决核心问题，如关键算法，修复致命bug。&lt;/li&gt;
&lt;li&gt;知识面要广，不拘限于某种单一的语言或者技术。每一种语言或者技术都有它擅长的邻域，只要把它用在恰当的地方即可。&lt;/li&gt;
&lt;/ul&gt;
&lt;h1 id=&quot;如何定义一个能力很强的主程&quot;&gt;2. 如何定义一个能力很强的主程&lt;/h1&gt;&lt;ul&gt;
&lt;li&gt;首先应该是一个能力很强的程序员plus&lt;/li&gt;
&lt;li&gt;具备很强的识人能力，在短短的面试阶段，能甄别出真正适合自己团队的人才，所谓的适合不是面试笔试对答如流，而是具备上面说的优秀程序员的特性，或者非常有潜力成为这样的程序。&lt;/li&gt;
&lt;li&gt;合理的安排任务，不把下属当工具人：根据团队成员的特性指派合适的任务，并给予高度自主权，所谓的合适，可能是该程序在某一方面的特长，或者是某一方面的技能需要历练，在出色的完成工作同时能得到能力上的提升。&lt;/li&gt;
&lt;li&gt;把控进度的能力。对于完成策划需求的用时预估要准确，在给下属留有一定缓冲的同时，尽可能早的让策划看到原型。&lt;/li&gt;
&lt;li&gt;对游戏有深刻理解，知道策划最终想要什么，还有他们此时此刻最想要什么。这有助于版本的快速迭代和上面说的进度把控。&lt;/li&gt;
&lt;li&gt;留得往人。给下属争取更多的利益，给下属足够的发展空间。很简单直接，要么钱给够，要么不让人受委屈。 &lt;/li&gt;
&lt;/ul&gt;
&lt;h1 id=&quot;关于开源&quot;&gt;3. 关于开源&lt;/h1&gt;&lt;ul&gt;
&lt;li&gt;代码就像是程序员的底裤，不能随便给人看的。代码开源，就是把自己的内裤扒出来给人看。秀出来的，一定是很屌的东西。&lt;/li&gt;
&lt;li&gt;不能为了开源而开源。开源应该是一个造轮子的过程，这个轮子不能重复造。一定是因为某个项目，或者库，可能会对别人有帮助。不能是说，以前我做了个很牛很牛的项目，现在把它的代码开源，来炫一下技。还有一些通过歪门邪道来骗赞的就不说了。&lt;/li&gt;
&lt;li&gt;开源可以让自己的综合能力得到迅速提高。开源，其实说白了就是相互白嫖的过程。社区里什么牛马蛇神都有，大家共同维护一个项目，无私奉献和拿来主意都能各取所需，大家者有各自的需求。在这里，每设计一个接口，每提供一个功能，都会不由自主的考虑，这是不是大部分人想要的？会不会让项目变能冗余？能不能做的更通用点？扩展性好不好？等等这些问题，我们的自己的闭源项目里是很少思考的。长期以往，就会本能的写出更优质的代码，我们程序员最向往的高内聚，低耦合的代码。&lt;/li&gt;
&lt;/ul&gt;</summary>


  </entry>
  
  <entry>
    <title>VScode的C#配置问题</title>
    <link href="http://blog.coding1024.com/posts/a421e405/"/>
    <id>http://blog.coding1024.com/posts/a421e405/</id>
    <published>2022-12-27T14:46:37.000Z</published>
    <updated>2026-05-30T02:35:53.612Z</updated>
    
    <content type="html"><![CDATA[<blockquote><p>vscode的C#智能提示老是会自动失效，最近又遇到了新问题<br>今天突然就出现了这个报错</p></blockquote><figure class="highlight plaintext"><table><tr><td class="code"><pre><span class="line">System.Composition.Hosting.CompositionFailedException: No export was found for the contract &#x27;ILoggerFactory&#x27;</span><br></pre></td></tr></table></figure><p>原因是vscode的omnisharp自动更新了，在settings.json里找到omnisharp.path字段，把lastest值改为1.39.2</p><figure class="highlight plaintext"><table><tr><td class="code"><pre><span class="line">&quot;omnisharp.path&quot;: &quot;1.39.2&quot;,</span><br></pre></td></tr></table></figure><h1 id="插件的自动更新是问题频发的根源，下面总结了一些稳定能用的版本">1. 插件的自动更新是问题频发的根源，下面总结了一些稳定能用的版本</h1><ul><li>dotnet framework版本:v4.7.1</li><li>unity的vscode package版本:1.2.0(在manifest.json中配置, “com.unity.ide.vscode”: “1.2.0”)</li><li>vscode的C#插件版本:v1.24.0(在卸载按钮旁边的小剪头，点击安装另一个版本)</li><li>vscode的omnisharp版本:1.39.2(settings.json里的omnisharp.path字段)</li></ul><h1 id="dotnet-framework默认安装路径">2. dotnet framework默认安装路径</h1><p>C:\Program Files (x86)\Reference Assemblies\Microsoft\Framework.NETFramework\v4.7.1</p>]]></content>
    
    
    <summary type="html">&lt;blockquote&gt;
&lt;p&gt;vscode的C#智能提示老是会自动失效，最近又遇到了新问题&lt;br&gt;今天突然就出现了这个报错&lt;/p&gt;
&lt;/blockquote&gt;
&lt;figure class=&quot;highlight plaintext&quot;&gt;&lt;table&gt;&lt;tr&gt;&lt;td class=&quot;code&quot;&gt;&lt;pre&gt;&lt;span class=&quot;line&quot;&gt;System.Composition.Hosting.CompositionFailedException: No export was found for the contract &amp;#x27;ILoggerFactory&amp;#x27;&lt;/span&gt;&lt;br&gt;&lt;/pre&gt;&lt;/td&gt;&lt;/tr&gt;&lt;/table&gt;&lt;/figure&gt;
&lt;p&gt;原因是vscode的omnisharp自动更新了，在settings.json里找到omnisharp.path字段，把lastest值改为1.39.2&lt;/p&gt;
&lt;figure class=&quot;highlight plaintext&quot;&gt;&lt;table&gt;&lt;tr&gt;&lt;td class=&quot;code&quot;&gt;&lt;pre&gt;&lt;span class=&quot;line&quot;&gt;&amp;quot;omnisharp.path&amp;quot;: &amp;quot;1.39.2&amp;quot;,&lt;/span&gt;&lt;br&gt;&lt;/pre&gt;&lt;/td&gt;&lt;/tr&gt;&lt;/table&gt;&lt;/figure&gt;

&lt;h1 id=&quot;插件的自动更新是问题频发的根源，下面总结了一些稳定能用的版本&quot;&gt;1. 插件的自动更新是问题频发的根源，下面总结了一些稳定能用的版本&lt;/h1&gt;&lt;ul&gt;
&lt;li&gt;dotnet framework版本:v4.7.1&lt;/li&gt;
&lt;li&gt;unity的vscode package版本:1.2.0(在manifest.json中配置, “com.unity.ide.vscode”: “1.2.0”)&lt;/li&gt;
&lt;li&gt;vscode的C#插件版本:v1.24.0(在卸载按钮旁边的小剪头，点击安装另一个版本)&lt;/li&gt;
&lt;li&gt;vscode的omnisharp版本:1.39.2(settings.json里的omnisharp.path字段)&lt;/li&gt;
&lt;/ul&gt;
&lt;h1 id=&quot;dotnet-framework默认安装路径&quot;&gt;2. dotnet framework默认安装路径&lt;/h1&gt;</summary>


    <category term="Unity" scheme="http://blog.coding1024.com/categories/Unity/"/>
    
    
    <category term="vscode" scheme="http://blog.coding1024.com/tags/vscode/"/>
    
  </entry>
  
  <entry>
    <title>上传Youtube如何关闭广告</title>
    <link href="http://blog.coding1024.com/posts/15d916ce/"/>
    <id>http://blog.coding1024.com/posts/15d916ce/</id>
    <published>2022-12-26T14:55:41.000Z</published>
    <updated>2026-05-30T02:35:53.547Z</updated>
    
    <content type="html"><![CDATA[<p>最近在youtube上传了个应用的预览视频，给GooglePlay展示用，但是没过几天就被GooglePlay撤掉了。猜测原因是广告问题，我点开我上传的视频，总是偶尔会有广告出来。看文档是关闭视频的创收即可，我翻遍了整个youtube的各种设置界面都找不到关闭创收的按钮或选项，我压根就没有达到youtube合作伙伴的要求，何来关闭创收一说，可是我的视频广告是从何而来呢。</p><p>折腾了好久，还是搞不定，最后只能救助于GooglePlay的客服。</p><figure class="highlight plaintext"><table><tr><td class="code"><pre><span class="line">我的APP视频预览看不到了，猜测原因是我的youtube视频仍存在广告。但是我的youtube账号未加入合作伙伴计划，我在创收页面找不到关闭广告的选项，在选中视频内容的时候也找不到创收的选项。请问有什么办法关闭youtube的广告，或者是其它办法让APP的视频预览恢复？</span><br></pre></td></tr></table></figure><p>谷歌的回信</p><figure class="highlight plaintext"><table><tr><td class="code"><pre><span class="line">经过调查，目前系统侦测到您的宣传影片含有盈利功能，而是否含有相关功能是由系统来判定的。如果您的视频中含有广告，则必须停用广告，视频才能在 Play 商店中展示。我们希望当用户浏览 Play 商店时他们看到的视频展示的是您的应用，而不是广告，因为广告可能会令用户感到困惑。</span><br><span class="line"></span><br><span class="line">您可以参考此帮助中心与以下视频要求：</span><br><span class="line">·关闭影片中的营利功能</span><br><span class="line">·上传一个不含获利声明的视频，然后在 Google Play 管理中心内更新视频网址。</span><br><span class="line">·将视频的隐私设置设为公开或不公开列出。请勿将其设为不公开。</span><br><span class="line">·确保您的视频可嵌入 Play 商店 Android 应用和网站。</span><br><span class="line">重要提示：如果您的视频使用了受版权保护的内容，那么即使您为该视频关闭了获利功能，也可能无法避免其展示广告。在这种情况下，您需要换一个视频（该视频应不含受版权保护的内容，不带有获利声明）。</span><br></pre></td></tr></table></figure><p>经检查发现，果然是因为我的视频里的背景音乐收到了版本主张。<br>Youtube对音乐版本非常严格，不像国内的抖音一类可以随便嫖。有商用需求的话，一定要避免版权问题，可以直接购买该音乐的版权(通常我们一般人做不到)，又或者可以免费使用CC版权音乐。</p><h3 id="推荐几个CC版权的网站">0.0.1. 推荐几个CC版权的网站</h3><ul><li>爱给网里的CC版权库</li><li>Youtube工作室里的音频库</li></ul><h3 id="推荐几个免费音乐的Youtube频道">0.0.2. 推荐几个免费音乐的Youtube频道</h3><ul><li>Royalty-Free Music: <a href="https://www.youtube.com/playlist?list=PLHEabrqpFr0PlkzCTrgZ6ChhrtKSAgqyj">https://www.youtube.com/playlist?list=PLHEabrqpFr0PlkzCTrgZ6ChhrtKSAgqyj</a></li><li>RFM: <a href="https://www.youtube.com/channel/UCyytiQuL-5S59OX1opqG-bQ">https://www.youtube.com/channel/UCyytiQuL-5S59OX1opqG-bQ</a></li><li>FreeMusicWave：<a href="https://www.youtube.com/user/freemusicwave">https://www.youtube.com/user/freemusicwave</a></li><li>Vlog No Copyright Music:<a href="https://www.youtube.com/channel/UCEickjZj99-JJIU8_IJ7J-Q">https://www.youtube.com/channel/UCEickjZj99-JJIU8_IJ7J-Q</a></li></ul>]]></content>
    
    
    <summary type="html">&lt;p&gt;最近在youtube上传了个应用的预览视频，给GooglePlay展示用，但是没过几天就被GooglePlay撤掉了。猜测原因是广告问题，我点开我上传的视频，总是偶尔会有广告出来。看文档是关闭视频的创收即可，我翻遍了整个youtube的各种设置界面都找不到关闭创收的按钮或选项，我压根就没有达到youtube合作伙伴的要求，何来关闭创收一说，可是我的视频广告是从何而来呢。&lt;/p&gt;
&lt;p&gt;折腾了好久，还是搞不定，最后只能救助于GooglePlay的客服。&lt;/p&gt;
&lt;figure class=&quot;highlight plaintext&quot;&gt;&lt;table&gt;&lt;tr&gt;&lt;td class=&quot;code&quot;&gt;&lt;pre&gt;&lt;span class=&quot;line&quot;&gt;我的APP视频预览看不到了，猜测原因是我的youtube视频仍存在广告。但是我的youtube账号未加入合作伙伴计划，我在创收页面找不到关闭广告的选项，在选中视频内容的时候也找不到创收的选项。请问有什么办法关闭youtube的广告，或者是其它办法让APP的视频预览恢复？&lt;/span&gt;&lt;br&gt;&lt;/pre&gt;&lt;/td&gt;&lt;/tr&gt;&lt;/table&gt;&lt;/figure&gt;
&lt;p&gt;谷歌的回信&lt;/p&gt;
&lt;figure class=&quot;highlight plaintext&quot;&gt;&lt;table&gt;&lt;tr&gt;&lt;td class=&quot;code&quot;&gt;&lt;pre&gt;&lt;span class=&quot;line&quot;&gt;经过调查，目前系统侦测到您的宣传影片含有盈利功能，而是否含有相关功能是由系统来判定的。如果您的视频中含有广告，则必须停用广告，视频才能在 Play 商店中展示。我们希望当用户浏览 Play 商店时他们看到的视频展示的是您的应用，而不是广告，因为广告可能会令用户感到困惑。&lt;/span&gt;&lt;br&gt;&lt;span class=&quot;line&quot;&gt;&lt;/span&gt;&lt;br&gt;&lt;span class=&quot;line&quot;&gt;您可以参考此帮助中心与以下视频要求：&lt;/span&gt;&lt;br&gt;&lt;span class=&quot;line&quot;&gt;·关闭影片中的营利功能&lt;/span&gt;&lt;br&gt;&lt;span class=&quot;line&quot;&gt;·上传一个不含获利声明的视频，然后在 Google Play 管理中心内更新视频网址。&lt;/span&gt;&lt;br&gt;&lt;span class=&quot;line&quot;&gt;·将视频的隐私设置设为公开或不公开列出。请勿将其设为不公开。&lt;/span&gt;&lt;br&gt;&lt;span class=&quot;line&quot;&gt;·确保您的视频可嵌入 Play 商店 Android 应用和网站。&lt;/span&gt;&lt;br&gt;&lt;span class=&quot;line&quot;&gt;重要提示：如果您的视频使用了受版权保护的内容，那么即使您为该视频关闭了获利功能，也可能无法避免其展示广告。在这种情况下，您需要换一个视频（该视频应不含受版权保护的内容，不带有获利声明）。&lt;/span&gt;&lt;br&gt;&lt;/pre&gt;&lt;/td&gt;&lt;/tr&gt;&lt;/table&gt;&lt;/figure&gt;
&lt;p&gt;经检查发现，果然是因为我的视频里的背景音乐收到了版本主张。&lt;br&gt;Youtube对音乐版本非常严格，不像国内的抖音一类可以随便嫖。有商用需求的话，一定要避免版权问题，可以直接购买该音乐的版权(通常我们一般人做不到)，又或者可以免费使用CC版权音乐。&lt;/p&gt;
&lt;h3 id=&quot;推荐几个CC版权的网站&quot;&gt;0.0.1. 推荐几个CC版权的网站&lt;/h3&gt;</summary>


    <category term="其它" scheme="http://blog.coding1024.com/categories/%E5%85%B6%E5%AE%83/"/>
    
    
    <category term="运营" scheme="http://blog.coding1024.com/tags/%E8%BF%90%E8%90%A5/"/>
    
    <category term="Youtube" scheme="http://blog.coding1024.com/tags/Youtube/"/>
    
  </entry>
  
  <entry>
    <title>特斯拉灯光秀Light Show Creator开发手记(二)</title>
    <link href="http://blog.coding1024.com/posts/9ccdb535/"/>
    <id>http://blog.coding1024.com/posts/9ccdb535/</id>
    <published>2022-12-20T03:43:29.000Z</published>
    <updated>2026-05-30T02:35:53.590Z</updated>
    
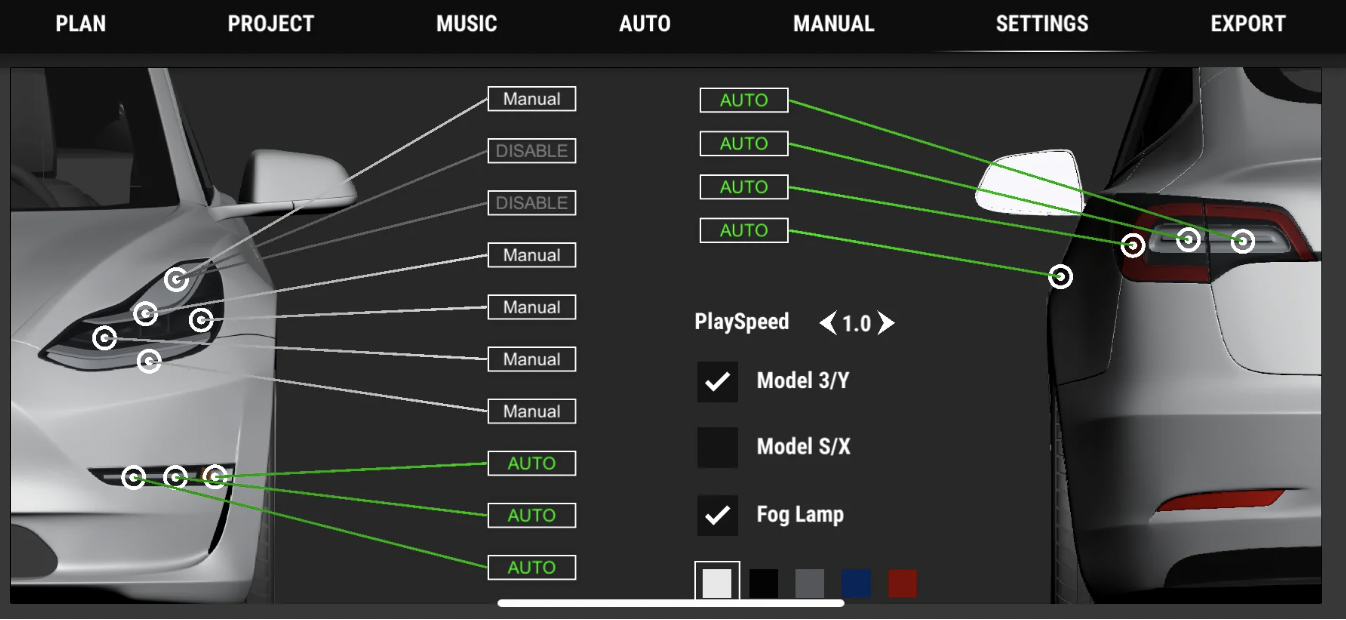
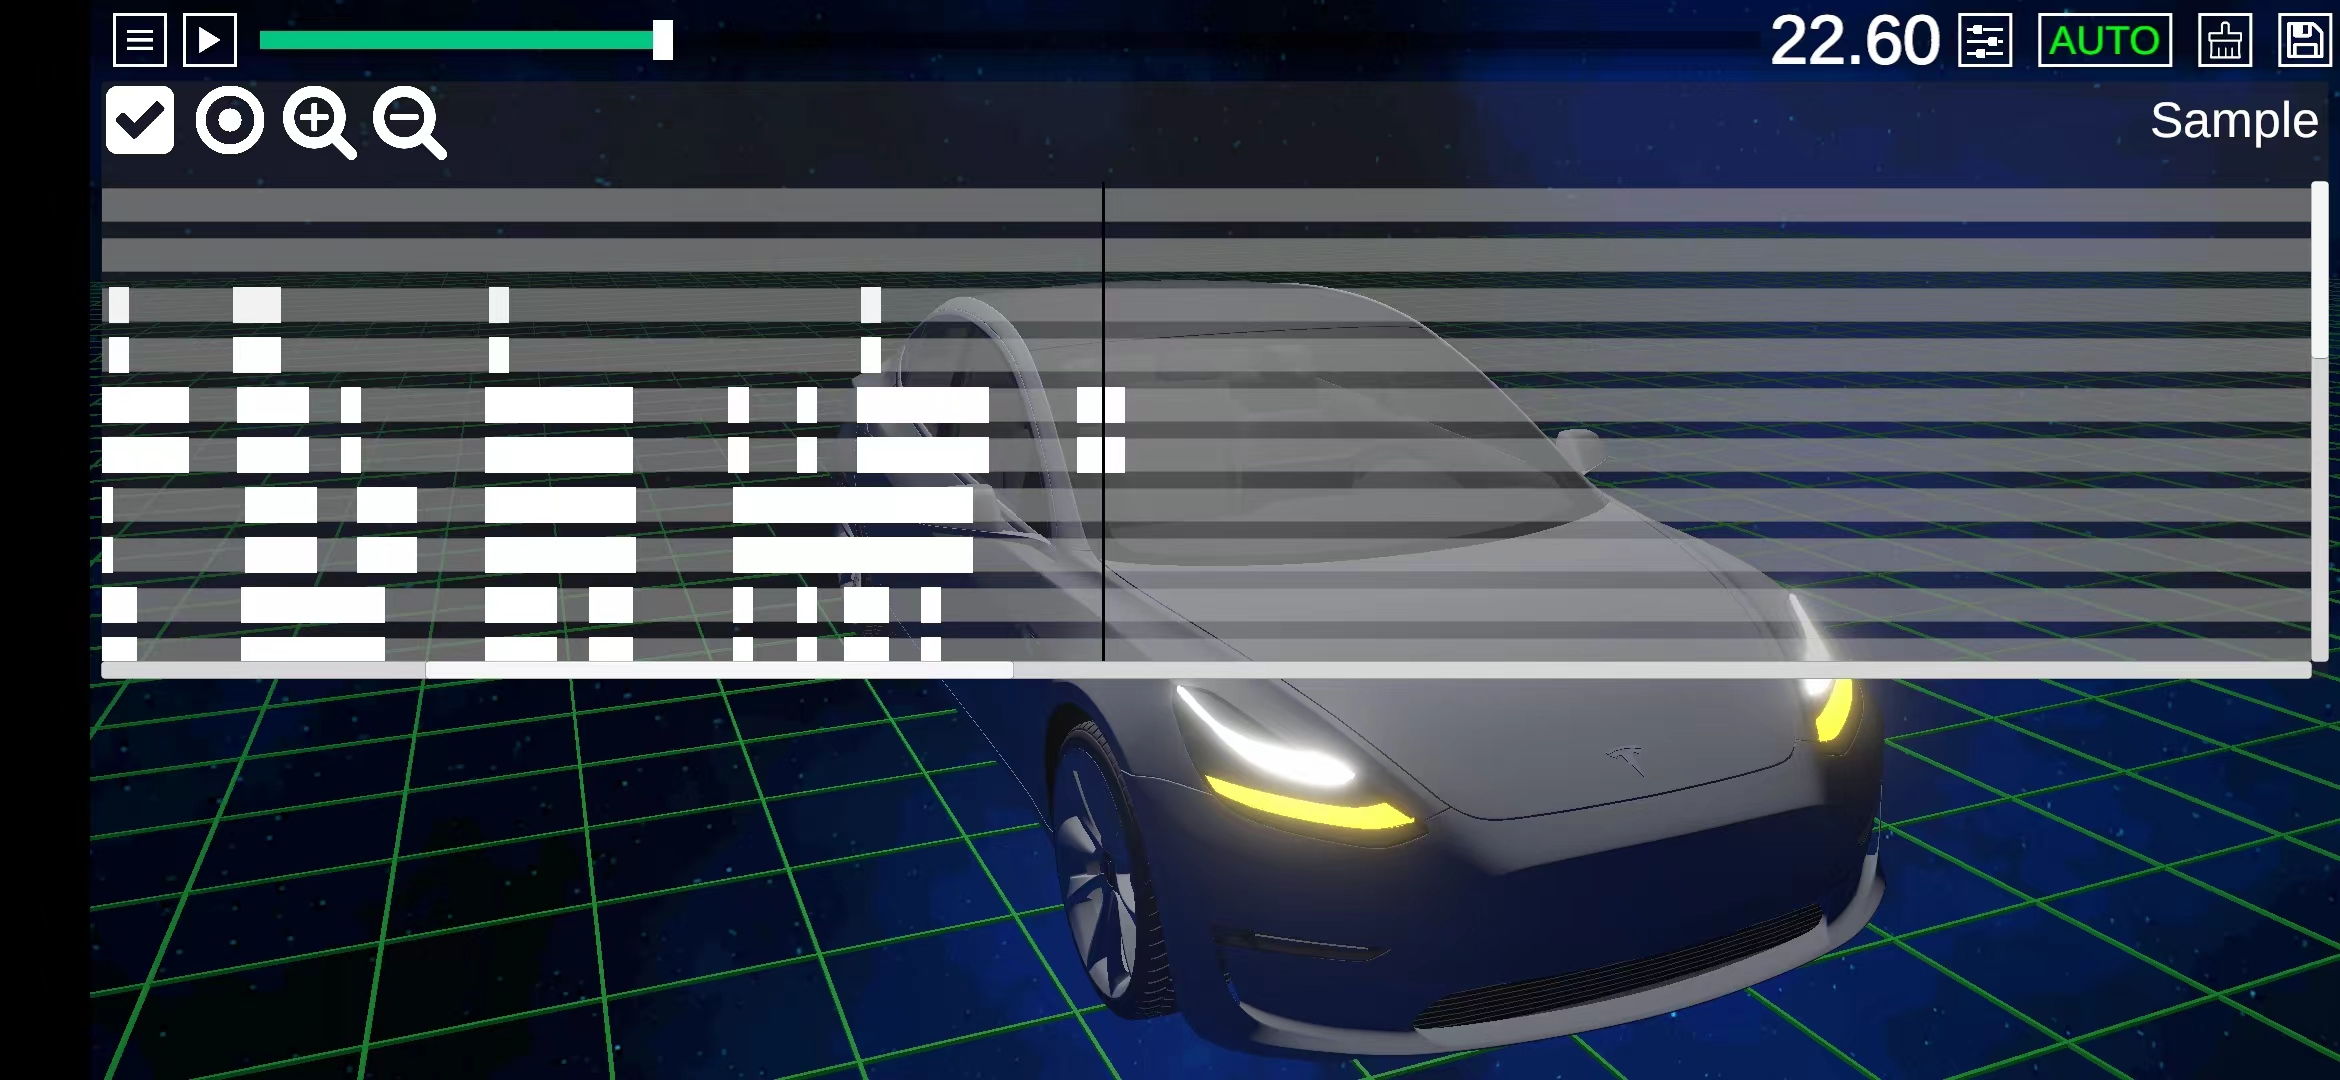
    <content type="html"><![CDATA[<blockquote><p>Light Show Creator这个APP已经上架一段时间，有用户反馈说，自动模式虽然好用，但是手动模式更加适合手机平台。于是我在新版本里添加了手动模式的规划。</p></blockquote><p><img src="/posts/9ccdb535/preview.gif"></p><p>其实在最早的版本，是有手动模式的，实现的原理跟xLights类似，都是通过时间轴来进行编辑。结果做出来效果很不理想，时间轴的控制更加精细，更适合用鼠标的控制，而不适合触摸屏。所以我在第一个正式版本抛弃了手动模式，只保留了自动模式。</p><blockquote><p><img src="/posts/9ccdb535/old.jpeg" alt="旧版本"><br>旧版本很难用</p></blockquote><p>我最近看到了一个钢琴类APP，受到了一点启发，我可以把控制车灯的方式改为类似钢琴的键盘，按下灯亮，松手灯灭。可以单独控制一边的车灯，也可以按黑键同时激活两边的车灯。<br><img src="/posts/9ccdb535/manual.png"></p><p>在手动录制的同时，也可以激活自动模式，只需要自己控制关键的几个车灯即可。<br><img src="/posts/9ccdb535/settings.png"></p>]]></content>


    <summary type="html">&lt;blockquote&gt;
&lt;p&gt;Light Show Creator这个APP已经上架一段时间，有用户反馈说，自动模式虽然好用，但是手动模式更加适合手机平台。于是我在新版本里添加了手动模式的规划。&lt;/p&gt;
&lt;/blockquote&gt;
&lt;p&gt;&lt;img src=&quot;/posts/9cc</summary>


    <category term="tesla" scheme="http://blog.coding1024.com/categories/tesla/"/>
    
    
    <category term="Unity" scheme="http://blog.coding1024.com/tags/Unity/"/>
    
    <category term="tesla" scheme="http://blog.coding1024.com/tags/tesla/"/>
    
    <category term="Light Show Creator" scheme="http://blog.coding1024.com/tags/Light-Show-Creator/"/>
    
  </entry>
  
  <entry>
    <title>Nginx修改文件大小限制</title>
    <link href="http://blog.coding1024.com/posts/4a413d3a/"/>
    <id>http://blog.coding1024.com/posts/4a413d3a/</id>
    <published>2022-11-27T08:42:25.000Z</published>
    <updated>2026-05-30T02:35:53.547Z</updated>
    
    <content type="html"><![CDATA[<p>nginx做http代理的默认配置对请求包体大小有限制1M以内，如果超过个值会返回413错误码，及Request Entity Too Large这些的错误信息。修改一下nginx的配置即可：</p><figure class="highlight plaintext"><table><tr><td class="code"><pre><span class="line">http &#123;</span><br><span class="line">    ...</span><br><span class="line">    #上传文件的大小限制  默认1m</span><br><span class="line">    client_max_body_size 8m;</span><br><span class="line">    ...</span><br><span class="line">&#125;</span><br></pre></td></tr></table></figure>]]></content>


    <summary type="html">&lt;p&gt;nginx做http代理的默认配置对请求包体大小有限制1M以内，如果超过个值会返回413错误码，及Request Entity Too Large这些的错误信息。修改一下nginx的配置即可：&lt;/p&gt;
&lt;figure class=&quot;highlight plaintext&quot;&gt;</summary>


    <category term="linux" scheme="http://blog.coding1024.com/categories/linux/"/>
    
    
    <category term="linux" scheme="http://blog.coding1024.com/tags/linux/"/>
    
  </entry>
  
  <entry>
    <title>批量删除文件中的^M符号</title>
    <link href="http://blog.coding1024.com/posts/5dcaa2e/"/>
    <id>http://blog.coding1024.com/posts/5dcaa2e/</id>
    <published>2022-11-19T03:17:16.000Z</published>
    <updated>2026-05-30T02:35:53.547Z</updated>
    
    <content type="html"><![CDATA[<blockquote><p>从windows直接拷贝文件到linux/macos可能会出现行尾留下”^M”符号，git diff可见到，是因为windows的换行使用的是\r\n两个字符。</p></blockquote><h1 id="安装dos2unix">1. 安装dos2unix</h1><p>Ubuntu/Debian:</p><figure class="highlight plaintext"><table><tr><td class="code"><pre><span class="line">sudo apt-get install dos2unix</span><br></pre></td></tr></table></figure><p>Centos:</p><figure class="highlight plaintext"><table><tr><td class="code"><pre><span class="line">sudo yum install dos2unix</span><br></pre></td></tr></table></figure><p>MacOS</p><figure class="highlight plaintext"><table><tr><td class="code"><pre><span class="line">brew install dos2unix</span><br></pre></td></tr></table></figure><h1 id="转换单个文件">2. 转换单个文件</h1><figure class="highlight plaintext"><table><tr><td class="code"><pre><span class="line">dos2unix filename</span><br></pre></td></tr></table></figure><h1 id="批量转换">3. 批量转换</h1><figure class="highlight plaintext"><table><tr><td class="code"><pre><span class="line">find ./ -name *.lua | xargs dos2unix</span><br></pre></td></tr></table></figure>]]></content>
    
    
    <summary type="html">&lt;blockquote&gt;
&lt;p&gt;从windows直接拷贝文件到linux/macos可能会出现行尾留下”^M”符号，git diff可见到，是因为windows的换行使用的是&#92;r&#92;n两个字符。&lt;/p&gt;
&lt;/blockquote&gt;
&lt;h1 id=&quot;安装dos2unix&quot;&gt;1. 安装dos2unix&lt;/h1&gt;&lt;p&gt;Ubuntu/Debian:&lt;/p&gt;
&lt;figure class=&quot;highlight plaintext&quot;&gt;&lt;table&gt;&lt;tr&gt;&lt;td class=&quot;code&quot;&gt;&lt;pre&gt;&lt;span class=&quot;line&quot;&gt;sudo apt-get install dos2unix&lt;/span&gt;&lt;br&gt;&lt;/pre&gt;&lt;/td&gt;&lt;/tr&gt;&lt;/table&gt;&lt;/figure&gt;

&lt;p&gt;Centos:&lt;/p&gt;
&lt;figure class=&quot;highlight plaintext&quot;&gt;&lt;table&gt;&lt;tr&gt;&lt;td class=&quot;code&quot;&gt;&lt;pre&gt;&lt;span class=&quot;line&quot;&gt;sudo yum install dos2unix&lt;/span&gt;&lt;br&gt;&lt;/pre&gt;&lt;/td&gt;&lt;/tr&gt;&lt;/table&gt;&lt;/figure&gt;

&lt;p&gt;MacOS&lt;/p&gt;</summary>


    <category term="linux" scheme="http://blog.coding1024.com/categories/linux/"/>
    
    
    <category term="linux" scheme="http://blog.coding1024.com/tags/linux/"/>
    
  </entry>
  
  <entry>
    <title>Ubuntu更换源</title>
    <link href="http://blog.coding1024.com/posts/fde212d5/"/>
    <id>http://blog.coding1024.com/posts/fde212d5/</id>
    <published>2022-11-16T02:45:19.000Z</published>
    <updated>2026-05-30T02:35:53.547Z</updated>
    
    <content type="html"><![CDATA[<p>腾讯云的Ubuntu使用apt安装软件会报找不到源</p><figure class="highlight plaintext"><table><tr><td class="code"><pre><span class="line">Err:1 http://mirrors.tencentyun.com/ubuntu bionic/main amd64 m4 amd64 1.4.18-1</span><br><span class="line">  Something wicked happened resolving &#x27;mirrors.tencentyun.com:http&#x27; (-5 - No address associated with hostname)</span><br><span class="line">Ign:2 http://mirrors.tencentyun.com/ubuntu bionic/main amd64 autoconf all 2.69-11</span><br><span class="line">Ign:3 http://mirrors.tencentyun.com/ubuntu bionic/main amd64 autotools-dev all 20180224.1</span><br><span class="line">Ign:4 http://mirrors.tencentyun.com/ubuntu bionic/main amd64 automake all 1:1.15.1-3ubuntu2</span><br><span class="line">Err:2 http://mirrors.tencentyun.com/ubuntu bionic/main amd64 autoconf all 2.69-11</span><br><span class="line">  Something wicked happened resolving &#x27;mirrors.tencentyun.com:http&#x27; (-5 - No address associated with hostname)</span><br><span class="line">Err:3 http://mirrors.tencentyun.com/ubuntu bionic/main amd64 autotools-dev all 20180224.1</span><br><span class="line">  Something wicked happened resolving &#x27;mirrors.tencentyun.com:http&#x27; (-5 - No address associated with hostname)</span><br><span class="line">Err:4 http://mirrors.tencentyun.com/ubuntu bionic/main amd64 automake all 1:1.15.1-3ubuntu2</span><br><span class="line">  Something wicked happened resolving &#x27;mirrors.tencentyun.com:http&#x27; (-5 - No address associated with hostname)</span><br><span class="line">E: Failed to fetch http://mirrors.tencentyun.com/ubuntu/pool/main/m/m4/m4_1.4.18-1_amd64.deb  Something wicked happened resolving &#x27;mirrors.tencentyun.com:http&#x27; (-5 - No address associated with hostname)</span><br><span class="line">E: Failed to fetch http://mirrors.tencentyun.com/ubuntu/pool/main/a/autoconf/autoconf_2.69-11_all.deb  Something wicked happened resolving &#x27;mirrors.tencentyun.com:http&#x27; (-5 - No address associated with hostname)</span><br><span class="line">E: Failed to fetch http://mirrors.tencentyun.com/ubuntu/pool/main/a/autotools-dev/autotools-dev_20180224.1_all.deb  Something wicked happened resolving &#x27;mirrors.tencentyun.com:http&#x27; (-5 - No address associated with hostname)</span><br><span class="line">E: Failed to fetch http://mirrors.tencentyun.com/ubuntu/pool/main/a/automake-1.15/automake_1.15.1-3ubuntu2_all.deb  Something wicked happened resolving &#x27;mirrors.tencentyun.com:http&#x27; (-5 - No address associated with hostname)</span><br><span class="line">E: Unable to fetch some archives, maybe run apt-get update or try with --fix-missing?</span><br></pre></td></tr></table></figure><p>看着应该是mirrors.tencentyun.com挂了，都ping不通，更换源就好了:</p><h2 id="首先备份源列表">0.1. 首先备份源列表</h2><figure class="highlight plaintext"><table><tr><td class="code"><pre><span class="line">sudo cp /etc/apt/sources.list /etc/apt/sources.list.bk</span><br></pre></td></tr></table></figure><h2 id="修改sources-list文件">0.2. 修改sources.list文件</h2><figure class="highlight plaintext"><table><tr><td class="code"><pre><span class="line">sudo vi /etc/apt/sources.list</span><br></pre></td></tr></table></figure><h2 id="编辑-etc-apt-sources-list文件-在文件最前面添加阿里云镜像源">0.3. 编辑/etc/apt/sources.list文件, 在文件最前面添加阿里云镜像源</h2><figure class="highlight plaintext"><table><tr><td class="code"><pre><span class="line">deb http://mirrors.aliyun.com/ubuntu/ bionic main restricted universe multiverse</span><br><span class="line">deb http://mirrors.aliyun.com/ubuntu/ bionic-security main restricted universe multiverse</span><br><span class="line">deb http://mirrors.aliyun.com/ubuntu/ bionic-updates main restricted universe multiverse</span><br><span class="line">deb http://mirrors.aliyun.com/ubuntu/ bionic-proposed main restricted universe multiverse</span><br><span class="line">deb http://mirrors.aliyun.com/ubuntu/ bionic-backports main restricted universe multiverse</span><br><span class="line">deb-src http://mirrors.aliyun.com/ubuntu/ bionic main restricted universe multiverse</span><br><span class="line">deb-src http://mirrors.aliyun.com/ubuntu/ bionic-security main restricted universe multiverse</span><br><span class="line">deb-src http://mirrors.aliyun.com/ubuntu/ bionic-updates main restricted universe multiverse</span><br><span class="line">deb-src http://mirrors.aliyun.com/ubuntu/ bionic-proposed main restricted universe multiverse</span><br><span class="line">deb-src http://mirrors.aliyun.com/ubuntu/ bionic-backports main restricted universe multiverse</span><br></pre></td></tr></table></figure><h2 id="刷新列表">0.4. 刷新列表</h2><figure class="highlight plaintext"><table><tr><td class="code"><pre><span class="line">sudo apt-get update</span><br><span class="line">sudo apt-get upgrade</span><br></pre></td></tr></table></figure>]]></content>
    
    
    <summary type="html">&lt;p&gt;腾讯云的Ubuntu使用apt安装软件会报找不到源&lt;/p&gt;
&lt;figure class=&quot;highlight plaintext&quot;&gt;&lt;table&gt;&lt;tr&gt;&lt;td class=&quot;code&quot;&gt;&lt;pre&gt;&lt;span class=&quot;line&quot;&gt;Err:1 http://mirrors.tencentyun.com/ubuntu bionic/main amd64 m4 amd64 1.4.18-1&lt;/span&gt;&lt;br&gt;&lt;span class=&quot;line&quot;&gt;  Something wicked happened resolving &amp;#x27;mirrors.tencentyun.com:http&amp;#x27; (-5 - No address associated with hostname)&lt;/span&gt;&lt;br&gt;&lt;span class=&quot;line&quot;&gt;Ign:2 http://mirrors.tencentyun.com/ubuntu bionic/main amd64 autoconf all 2.69-11&lt;/span&gt;&lt;br&gt;&lt;span class=&quot;line&quot;&gt;Ign:3 http://mirrors.tencentyun.com/ubuntu bionic/main amd64 autotools-dev all 20180224.1&lt;/span&gt;&lt;br&gt;&lt;span class=&quot;line&quot;&gt;Ign:4 http://mirrors.tencentyun.com/ubuntu bionic/main amd64 automake all 1:1.15.1-3ubuntu2&lt;/span&gt;&lt;br&gt;&lt;span class=&quot;line&quot;&gt;Err:2 http://mirrors.tencentyun.com/ubuntu bionic/main amd64 autoconf all 2.69-11&lt;/span&gt;&lt;br&gt;&lt;span class=&quot;line&quot;&gt;  Something wicked happened resolving &amp;#x27;mirrors.tencentyun.com:http&amp;#x27; (-5 - No address associated with hostname)&lt;/span&gt;&lt;br&gt;&lt;span class=&quot;line&quot;&gt;Err:3 http://mirrors.tencentyun.com/ubuntu bionic/main amd64 autotools-dev all 20180224.1&lt;/span&gt;&lt;br&gt;&lt;span class=&quot;line&quot;&gt;  Something wicked happened resolving &amp;#x27;mirrors.tencentyun.com:http&amp;#x27; (-5 - No address associated with hostname)&lt;/span&gt;&lt;br&gt;&lt;span class=&quot;line&quot;&gt;Err:4 http://mirrors.tencentyun.com/ubuntu bionic/main amd64 automake all 1:1.15.1-3ubuntu2&lt;/span&gt;&lt;br&gt;&lt;span class=&quot;line&quot;&gt;  Something wicked happened resolving &amp;#x27;mirrors.tencentyun.com:http&amp;#x27; (-5 - No address associated with hostname)&lt;/span&gt;&lt;br&gt;&lt;span class=&quot;line&quot;&gt;E: Failed to fetch http://mirrors.tencentyun.com/ubuntu/pool/main/m/m4/m4_1.4.18-1_amd64.deb  Something wicked happened resolving &amp;#x27;mirrors.tencentyun.com:http&amp;#x27; (-5 - No address associated with hostname)&lt;/span&gt;&lt;br&gt;&lt;span class=&quot;line&quot;&gt;E: Failed to fetch http://mirrors.tencentyun.com/ubuntu/pool/main/a/autoconf/autoconf_2.69-11_all.deb  Something wicked happened resolving &amp;#x27;mirrors.tencentyun.com:http&amp;#x27; (-5 - No address associated with hostname)&lt;/span&gt;&lt;br&gt;&lt;span class=&quot;line&quot;&gt;E: Failed to fetch http://mirrors.tencentyun.com/ubuntu/pool/main/a/autotools-dev/autotools-dev_20180224.1_all.deb  Something wicked happened resolving &amp;#x27;mirrors.tencentyun.com:http&amp;#x27; (-5 - No address associated with hostname)&lt;/span&gt;&lt;br&gt;&lt;span class=&quot;line&quot;&gt;E: Failed to fetch http://mirrors.tencentyun.com/ubuntu/pool/main/a/automake-1.15/automake_1.15.1-3ubuntu2_all.deb  Something wicked happened resolving &amp;#x27;mirrors.tencentyun.com:http&amp;#x27; (-5 - No address associated with hostname)&lt;/span&gt;&lt;br&gt;&lt;span class=&quot;line&quot;&gt;E: Unable to fetch some archives, maybe run apt-get update or try with --fix-missing?&lt;/span&gt;&lt;br&gt;&lt;/pre&gt;&lt;/td&gt;&lt;/tr&gt;&lt;/table&gt;&lt;/figure&gt;
&lt;p&gt;看着应该是mirrors.tencentyun.com挂了，都ping不通，更换源就好了:&lt;/p&gt;
&lt;h2 id=&quot;首先备份源列表&quot;&gt;0.1. 首先备份源列表&lt;/h2&gt;&lt;figure class=&quot;highlight plaintext&quot;&gt;&lt;table&gt;&lt;tr&gt;&lt;td class=&quot;code&quot;&gt;&lt;pre&gt;&lt;span class=&quot;line&quot;&gt;sudo cp /etc/apt/sources.list /etc/apt/sources.list.bk&lt;/span&gt;&lt;br&gt;&lt;/pre&gt;&lt;/td&gt;&lt;/tr&gt;&lt;/table&gt;&lt;/figure&gt;

&lt;h2 id=&quot;修改sources-list文件&quot;&gt;0.2. 修改sources.list文件&lt;/h2&gt;&lt;figure class=&quot;highlight plaintext&quot;&gt;&lt;table&gt;&lt;tr&gt;&lt;td class=&quot;code&quot;&gt;&lt;pre&gt;&lt;span class=&quot;line&quot;&gt;sudo vi /etc/apt/sources.list&lt;/span&gt;&lt;br&gt;&lt;/pre&gt;&lt;/td&gt;&lt;/tr&gt;&lt;/table&gt;&lt;/figure&gt;</summary>


    <category term="linux" scheme="http://blog.coding1024.com/tags/linux/"/>
    
  </entry>
  
  <entry>
    <title>Unity快速引入Firebase</title>
    <link href="http://blog.coding1024.com/posts/cd4d0695/"/>
    <id>http://blog.coding1024.com/posts/cd4d0695/</id>
    <published>2022-11-14T16:21:24.000Z</published>
    <updated>2026-05-30T02:35:53.609Z</updated>
    
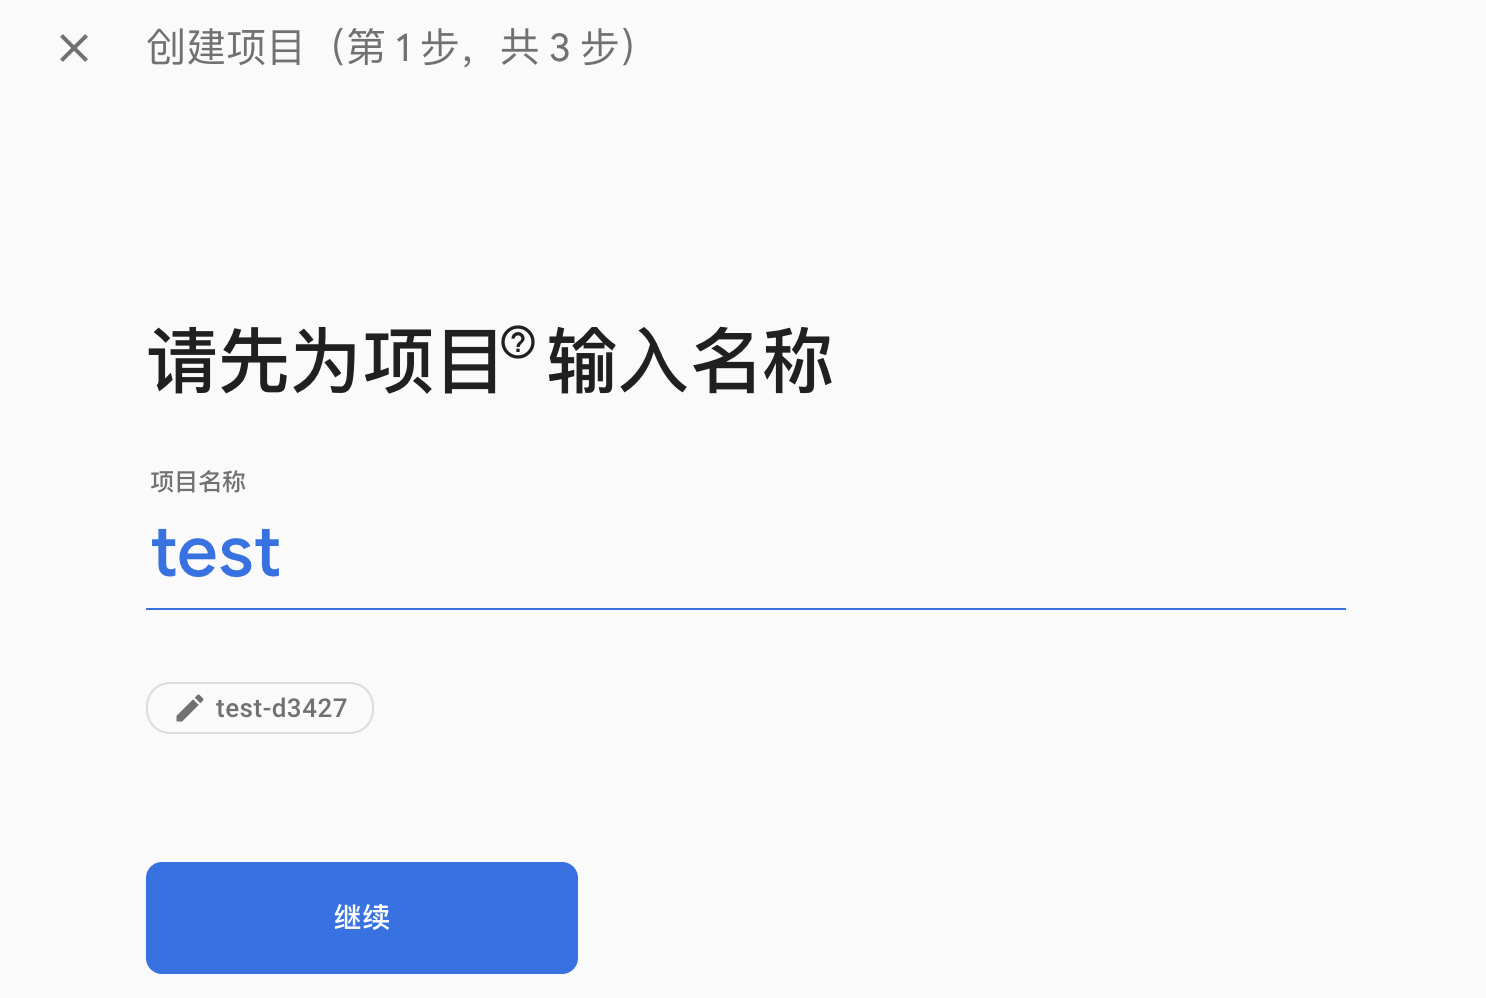
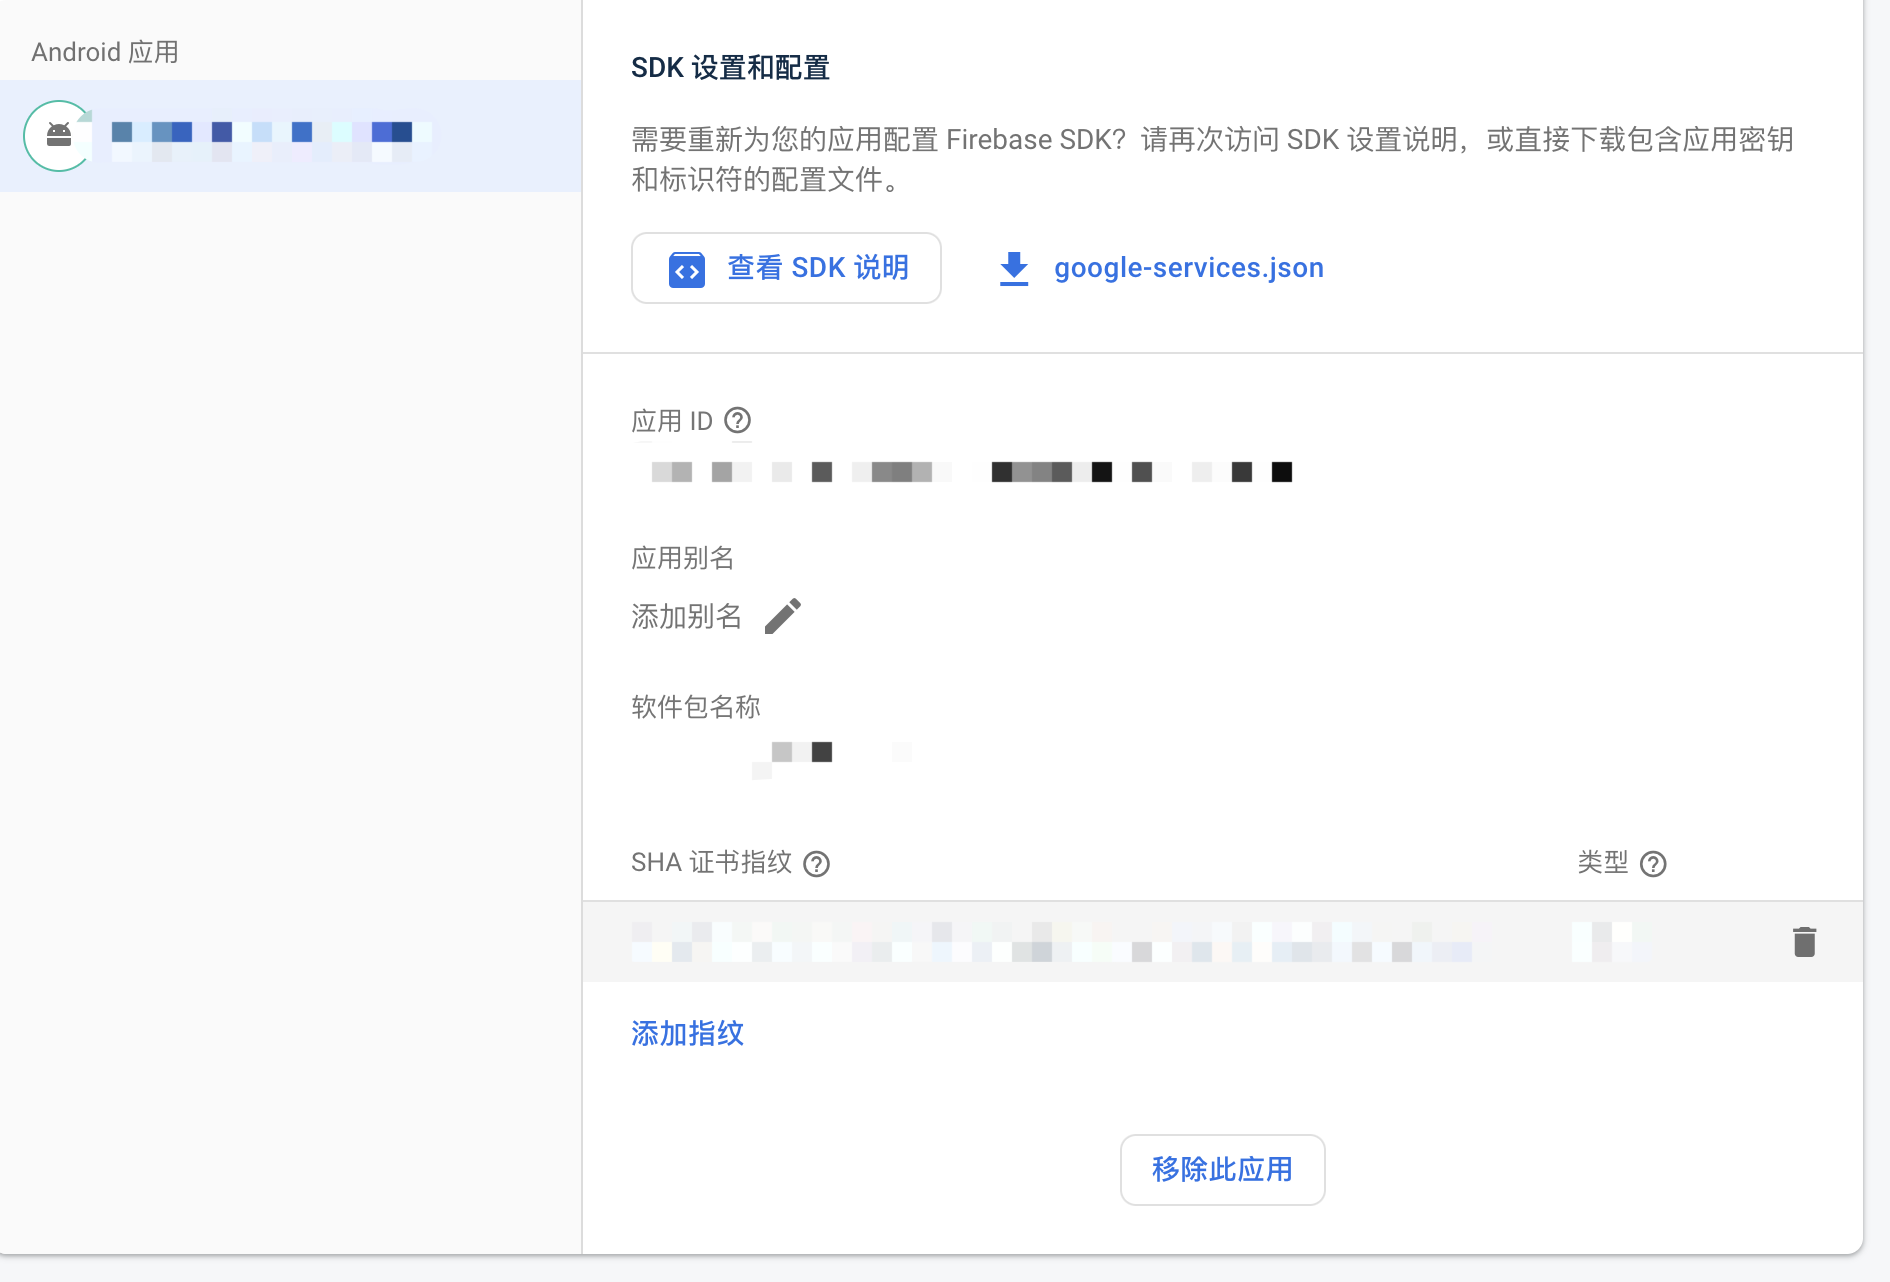
    <content type="html"><![CDATA[<blockquote><p>最近在尝试给APP引入账号第三方SDK，再三比较，如果是出海的APP，Firebase是不二选择。</p></blockquote><p>接入的过程中比较坎坷，分别尝试了AS导出aar包到unity，还有从unity导出AS工程，都以失败告终（IOS还未尝试）。</p><p>其实是根本就是我没仔细阅读官方文档，google官方有提供unitypackage，将其导入unity并在后台做简单设置即可。</p><p>官方文档：<a href="https://firebase.google.com/docs/auth/unity/start">https://firebase.google.com/docs/auth/unity/start</a></p><h2 id="在Firebase后台注册应用">0.1. 在Firebase后台注册应用</h2><p><img src="/posts/cd4d0695/img1.png"><br>(注意，注册的时的包名要跟应用的最终包名一致)</p><h2 id="在应用设置中添加SHA证书指纹">0.2. 在应用设置中添加SHA证书指纹</h2><p><img src="/posts/cd4d0695/img2.png"></p><h2 id="下载google-services-json">0.3. 下载google-services.json</h2><p>文件放到unity项目里的Asset/StreamingAssets中</p><h2 id="启用服务提供方">0.4. 启用服务提供方</h2><p><img src="/posts/cd4d0695/img3.png"></p><h2 id="导入FirebaseAuth-unitypackage">0.5. 导入FirebaseAuth.unitypackage</h2><h2 id="添加测试代码">0.6. 添加测试代码</h2><figure class="highlight plaintext"><table><tr><td class="code"><pre><span class="line">auth.CreateUserWithEmailAndPasswordAsync(email, password)</span><br><span class="line">            .ContinueWith(task =&gt;</span><br><span class="line">            &#123;</span><br><span class="line">                if (task.IsCanceled)</span><br><span class="line">                &#123;</span><br><span class="line">                    Debug.LogError(&quot;CreateUserWithEmailAndPasswordAsync was canceled.&quot;);</span><br><span class="line">                    return;</span><br><span class="line">                &#125;</span><br><span class="line">                if (task.IsFaulted)</span><br><span class="line">                &#123;</span><br><span class="line">                    Debug.LogError(</span><br><span class="line">                        &quot;CreateUserWithEmailAndPasswordAsync encountered an error: &quot;</span><br><span class="line">                            + task.Exception</span><br><span class="line">                    );</span><br><span class="line">                    return;</span><br><span class="line">                &#125;</span><br><span class="line"></span><br><span class="line">                // Firebase user has been created.</span><br><span class="line">                FirebaseUser newUser = task.Result;</span><br><span class="line">                Debug.LogFormat(</span><br><span class="line">                    &quot;Firebase user created successfully: &#123;0&#125; (&#123;1&#125;)&quot;,</span><br><span class="line">                    newUser.DisplayName,</span><br><span class="line">                    newUser.UserId</span><br><span class="line">                );</span><br><span class="line">            &#125;);</span><br></pre></td></tr></table></figure>]]></content>
    
    
    <summary type="html">&lt;blockquote&gt;
&lt;p&gt;最近在尝试给APP引入账号第三方SDK，再三比较，如果是出海的APP，Firebase是不二选择。&lt;/p&gt;
&lt;/blockquote&gt;
&lt;p&gt;接入的过程中比较坎坷，分别尝试了AS导出aar包到unity，还有从unity导出AS工程，都以失败告终（IOS还未尝试）。&lt;/p&gt;
&lt;p&gt;其实是根本就是我没仔细阅读官方文档，google官方有提供unitypackage，将其导入unity并在后台做简单设置即可。&lt;/p&gt;
&lt;p&gt;官方文档：&lt;a href=&quot;https://firebase.google.com/docs/auth/unity/start&quot;&gt;https://firebase.google.com/docs/auth/unity/start&lt;/a&gt;&lt;/p&gt;
&lt;h2 id=&quot;在Firebase后台注册应用&quot;&gt;0.1. 在Firebase后台注册应用&lt;/h2&gt;&lt;p&gt;&lt;img src=&quot;/posts/cd4d0695/img1.png&quot;&gt;&lt;br&gt;(注意，注册的时的包名要跟应用的最终包名一致)&lt;/p&gt;
&lt;h2 id=&quot;在应用设置中添加SHA证书指纹&quot;&gt;0.2. 在应用设置中添加SHA证书指纹&lt;/h2&gt;</summary>


    <category term="Unity" scheme="http://blog.coding1024.com/categories/Unity/"/>
    
    
    <category term="SDK" scheme="http://blog.coding1024.com/tags/SDK/"/>
    
  </entry>
  
  <entry>
    <title>Unity引入Firebase报错</title>
    <link href="http://blog.coding1024.com/posts/3a0ce390/"/>
    <id>http://blog.coding1024.com/posts/3a0ce390/</id>
    <published>2022-11-13T17:46:35.000Z</published>
    <updated>2026-05-30T02:35:53.609Z</updated>
    
    <content type="html"><![CDATA[<p>Unity在引入最新版本Firebase发现报错：</p><figure class="highlight plaintext"><table><tr><td class="code"><pre><span class="line">Could not determine the dependencies of task &#x27;:launcher:lintVitalRelease&#x27;.</span><br><span class="line">&gt; This project uses AndroidX dependencies, but the &#x27;android.useAndroidX&#x27; property is not enabled. Set this property to true in the gradle.properties file and retry.</span><br><span class="line">  The following AndroidX dependencies are detected: androidx.fragment:fragment:1.0.0, androidx.slidingpanelayout:slidingpanelayout:1.0.0,</span><br></pre></td></tr></table></figure><p>大致意思是项目依赖了AndroidX，但是android.useAndroidX没有enabled</p><p>解决方案：</p><p>BuildSettings-&gt;Player-&gt;Publishing Settings 勾选Custom Gradle Properties Template。之后unity会自动生模板配置 Assets/Plugins/Android/gradleTemplate.properties<br>在properties文件中添加以下两行:</p><figure class="highlight plaintext"><table><tr><td class="code"><pre><span class="line">android.useAndroidX=true</span><br><span class="line">android.enableJetifier=true</span><br></pre></td></tr></table></figure><p>修改之后：</p><figure class="highlight plaintext"><table><tr><td class="code"><pre><span class="line">org.gradle.jvmargs=-Xmx**JVM_HEAP_SIZE**M</span><br><span class="line">org.gradle.parallel=true</span><br><span class="line">android.enableR8=**MINIFY_WITH_R_EIGHT**</span><br><span class="line">unityStreamingAssets=**STREAMING_ASSETS**</span><br><span class="line">android.useAndroidX=true</span><br><span class="line">android.enableJetifier=true</span><br><span class="line">**ADDITIONAL_PROPERTIES**</span><br></pre></td></tr></table></figure><p>问题解决~</p>]]></content>
    
    
    <summary type="html">&lt;p&gt;Unity在引入最新版本Firebase发现报错：&lt;/p&gt;
&lt;figure class=&quot;highlight plaintext&quot;&gt;&lt;table&gt;&lt;tr&gt;&lt;td class=&quot;code&quot;&gt;&lt;pre&gt;&lt;span class=&quot;line&quot;&gt;Could not determine the dependencies of task &amp;#x27;:launcher:lintVitalRelease&amp;#x27;.&lt;/span&gt;&lt;br&gt;&lt;span class=&quot;line&quot;&gt;&amp;gt; This project uses AndroidX dependencies, but the &amp;#x27;android.useAndroidX&amp;#x27; property is not enabled. Set this property to true in the gradle.properties file and retry.&lt;/span&gt;&lt;br&gt;&lt;span class=&quot;line&quot;&gt;  The following AndroidX dependencies are detected: androidx.fragment:fragment:1.0.0, androidx.slidingpanelayout:slidingpanelayout:1.0.0,&lt;/span&gt;&lt;br&gt;&lt;/pre&gt;&lt;/td&gt;&lt;/tr&gt;&lt;/table&gt;&lt;/figure&gt;
&lt;p&gt;大致意思是项目依赖了AndroidX，但是android.useAndroidX没有enabled&lt;/p&gt;
&lt;p&gt;解决方案：&lt;/p&gt;
&lt;p&gt;BuildSettings-&amp;gt;Player-&amp;gt;Publishing Settings 勾选Custom Gradle Properties Template。之后unity会自动生模板配置 Assets/Plugins/Android/gradleTemplate.properties&lt;br&gt;在properties文件中添加以下两行:&lt;/p&gt;
&lt;figure class=&quot;highlight plaintext&quot;&gt;&lt;table&gt;&lt;tr&gt;&lt;td class=&quot;code&quot;&gt;&lt;pre&gt;&lt;span class=&quot;line&quot;&gt;android.useAndroidX=true&lt;/span&gt;&lt;br&gt;&lt;span class=&quot;line&quot;&gt;android.enableJetifier=true&lt;/span&gt;&lt;br&gt;&lt;/pre&gt;&lt;/td&gt;&lt;/tr&gt;&lt;/table&gt;&lt;/figure&gt;
&lt;p&gt;修改之后：&lt;/p&gt;</summary>


    <category term="Unity" scheme="http://blog.coding1024.com/categories/Unity/"/>
    
    
    <category term="编译" scheme="http://blog.coding1024.com/tags/%E7%BC%96%E8%AF%91/"/>
    
  </entry>
  
  <entry>
    <title>安卓手机无线调试</title>
    <link href="http://blog.coding1024.com/posts/3c859465/"/>
    <id>http://blog.coding1024.com/posts/3c859465/</id>
    <published>2022-11-13T13:43:44.000Z</published>
    <updated>2026-05-30T02:35:53.547Z</updated>
    
    <content type="html"><![CDATA[<blockquote><p>安卓手机从Android11开始支持无线调试，终于可以抛弃数据线了。</p></blockquote><h2 id="先决条件">0.1. 先决条件</h2><ul><li>Android 手机需要是 Android 11 以上系统；</li><li>电脑上的 Android SDK 工具需要 ≥ 30.0.0 版本，确认方式是：adb –version</li></ul><h2 id="使用配对码配对">0.2. 使用配对码配对</h2><ul><li>手机上启用开发者模式 -&gt; USB 调试 -&gt; 启用无线调试选项</li><li>点击无线调试 –&gt; 点击使用配对码配对设备 可以看到配对码、ip 和端口号</li><li>在电脑上的终端终端运行 adb pair ipaddr:port</li><li>输入 adb devices -l 即可看到通过无线连接成功的设备</li></ul><h2 id="使用二维码配对">0.3. 使用二维码配对</h2><ul><li>手机上启用开发者模式 -&gt; USB 调试 -&gt; 启用无线调试选项</li><li>点击扫码配对，在Android stuido设备菜单，选择Pair Devices Using WiFi</li></ul>]]></content>
    
    
    <summary type="html">&lt;blockquote&gt;
&lt;p&gt;安卓手机从Android11开始支持无线调试，终于可以抛弃数据线了。&lt;/p&gt;
&lt;/blockquote&gt;
&lt;h2 id=&quot;先决条件&quot;&gt;0.1. 先决条件&lt;/h2&gt;&lt;ul&gt;
&lt;li&gt;Android 手机需要是 Android 11 以上系统；&lt;/li&gt;
&lt;li&gt;电脑上的 Android SDK 工具需要 ≥ 30.0.0 版本，确认方式是：adb –version&lt;/li&gt;
&lt;/ul&gt;
&lt;h2 id=&quot;使用配对码配对&quot;&gt;0.2. 使用配对码配对&lt;/h2&gt;&lt;ul&gt;
&lt;li&gt;手机上启用开发者模式 -&amp;gt; USB 调试 -&amp;gt; 启用无线调试选项&lt;/li&gt;
&lt;li&gt;点击无线调试 –&amp;gt; 点击使用配对码配对设备 可以看到配对码、ip 和端口号&lt;/li&gt;
&lt;li&gt;在电脑上的终端终端运行 adb pair ipaddr:port&lt;/li&gt;
&lt;li&gt;输入 adb devices -l 即可看到通过无线连接成功的设备&lt;/li&gt;
&lt;/ul&gt;
&lt;h2 id=&quot;使用二维码配对&quot;&gt;0.3. 使用二维码配对&lt;/h2&gt;&lt;ul&gt;
&lt;li&gt;手机上启用开发者模式 -&amp;gt; USB 调试 -&amp;gt; 启用无线调试选项&lt;/li&gt;
&lt;li&gt;点击扫码配对，在Android stuido设备菜单，选择Pair Devices Using WiFi&lt;/li&gt;
&lt;/ul&gt;</summary>


    <category term="Android" scheme="http://blog.coding1024.com/categories/Android/"/>
    
    
    <category term="调试" scheme="http://blog.coding1024.com/tags/%E8%B0%83%E8%AF%95/"/>
    
  </entry>
  
</feed>